


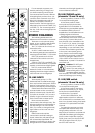
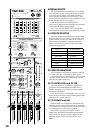

10
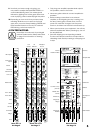
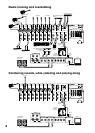
8. MID FREQ EQ
This adjusts the frequency of the MID EQ
(9) control from 100 Hz to 8 kHz. This gives
you great flexibility in shaping your sound.
Listen carefully for its effect.
9. MID EQ
Turn this clockwise to boost the level
of signals around the frequency set by
the MID FREQ (8) control. Turn it counter-
clockwise to cut the levels.
10. LOW EQ
Turn this clockwise to boost the level of
all frequencies below 80 Hz. Turn it counter-
clockwise to cut the levels. Try some boost
with the LOW CUT (6) switch on, so you
can boost useful bass, at the same time as
cutting unwanted subsonics.
Frequencies of 80 Hz and below
represent the punch in bass drums, bass
guitar, and wild Tuba raves.
11. AUX SEND 1 MON
This control taps the channel’s signal
before the channel FADER (17), and sends
it to the AUX 1 bus. The control ranges from
infinity (off) to +15 dB.
AUX SEND 1 MON is normally used to
send a separate mono mix to your stage
monitors, via the AUX SEND 1 (22) output
jack. Use the MASTER AUX SEND 1 (43)
knob to control the overall level.
Most of the channel controls will affect
the output to your stage monitors, except
for PAN (13), AUX SEND 2 FX (12) and the
channel FADER (17).
12. AUX SEND 2 FX
This control taps the channel’s signal
after the channel FADER (17), and sends it
to the AUX 2 bus. The control ranges from
infinity (off) to +15 dB.
The AUX SEND 2 FX bus feeds the
internal effects circuits, and optionally,
it can feed external effects devices (via
the AUX SEND 2 (23) output jack). Use the
MASTER AUX SEND 2 (44) to control the
overall effects level.
Most of the channel controls will affect
the output to the internal (or external)
processor, except for PAN (13) and AUX
SEND 1 MON (11).
13. PAN
This adjusts how much of the channel signal plays
in the left side of the main mix and subgroups, and
how much plays in the right. Careful use of PAN
allows you to set up a nice stereo image in the left
and right.
For the mono channels, if PAN is in the center
position, the mono signal appears equally in both
the left and right of the main mix. If the control is set
left, more of the signal appears in the left side. If the
control is set right, more of the signal appears in the
right side of the mix.
For stereo sources, where you are using two mono
channels, the standard convention is to plug in the
left signals into the odd-numbered channels, and
the right signals into even-numbered channels. Then
you can pan the odd channels hard left, and the
even channels hard right.
14. MUTE
Press this switch to prevent that channel’s signals
from reaching the main mix, aux, or subgroups.
(Soloed channels can still be heard in the control
room and phones.)
15. OL (OVERLOAD) LED
This will light when the channel’s signal is close to
clipping.
If this comes on, turn down the channel’s GAIN (4)
knob, or your EQ (7-10) settings. (The channel FADER
(17) or PAN (13) will have no effect.)
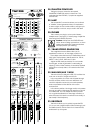
16. 1-2, 3-4, and L-R SWITCHES
These three switches are used to assign the
channel’s signal to the subgroups 1-2 and 3-4, and
the main mix L and R buses.
For example, if you want channel 1 to go to
the subgroup 1-2, and subgroup 3-4, press the 1-2
and 3-4 switches of channel 1. (The channel 1 PAN
(13) knob will pan the channel’s signal between
subgroup 1 and 2, and between subgroup 3 and 4.)
If you want channel 2 to appear on the main mix,
press L-R on channel 2.
17. FADER
This is the master level control for the channel’s
signal. Subtle adjustment of the channel faders is the
key to a finely-tuned mix.
Typically (providing the GAIN (4) is set correctly),
this will be somewhere near the 0 dB (U) position.
If you have the fader set all the way up, it’s usually
a sign that your GAIN (4) is set too low. If the fader is
set way down, your GAIN may be too high.
18. SOLO
Pressing this switch in will send the channel’s
signal to the control room and headphones output
for monitoring. The RUDE SOLO (47) light will flash
on and off as long as any of the solo switches are
engaged.
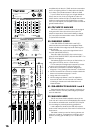
MIC
1
INST
INSERT
1
GAIN
1
MUTE
EQ
PAN
1
2
AUX
HIGH
MID
LOW
10
dB
30
20
10
40
50
5
5
60
U
7
8
9
10
11
12
13
14
15
17
16
16
16
18