


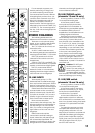
18
Appendix A: Using the Blend 16
At first glance, the controls on the front panel of the
Blend 16 may seem more at home in a space movie,
right next to the Navigation officer. Like most things,
it’s worse than that really. Here is a brief overview that
may help you understand the basic functions and
mysterious inner workings of the Blend 16.
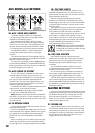
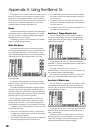
Buses
A public transportation bus takes many passengers
and delivers them to various destinations. In a similar
way, an audio bus combines multiple audio signals
and delivers them to an output.
The Blend 16 has two main mix buses, two auxiliary
buses, and four subgroup buses.
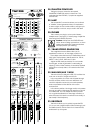
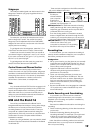
Main Mix Buses
The audio signals from the microphones, guitars,
instruments and keyboards of your wonder-band can
be combined in the main mix bus and sent to your
main amplifiers and speakers (or powered speakers).
This could be your Club speaker system, or Uncle
Ernie’s garage.
To get the channel signals onto the left and right
main mix buses, press the L-R buttons near the bottom
of each channel strip.
The channel PAN knobs adjust the signal balance
onto the buses. Mono signals are shared equally to
the left and right bus if the PAN is centered. With PAN
fully left, the signals just go onto the left bus, and with
PAN fully right, they go onto the right bus.
Each channel can be tweaked in EQ and level,
and the MAIN MIX FADER used to adjust the overall
volume level. The main mix can also be assigned to
the USB output, and sent to a computer for recording.
In addition to the channel inputs, the main mix can
receive the following:
• Each of the four subgroups has an L and R switch
to assign the output onto the main mix. See below
for more subgroup details.
• The CD/Tape input has a level control to adjust the
amount of signal going onto the main mix.
• The FX RETURN input has a similar control to adjust
the level of internal and external effects going on
to the main mix.
• Channels 15 and 16 can switch the audio output
from your computer’s software (such as Tracktion)
onto the main mix.
• Channels 13 and 14 can accept the signals from a
turntable onto the main mix.
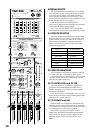
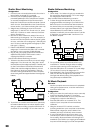
Auxiliary 1 Stage Monitor bus
The Aux 1 Mon bus is normally used for sending
an output to your stage monitors, so the band can
clearly hear what they are playing, amidst the wild
frenzy of the audience.
To get signals onto the Aux 1 Mon bus, rotate the
AUX SEND 1 controls located just below the EQ section
of each channel strip.
The stage monitors receive a mix that is
independent from the main mix, and not affected by
the channel faders or Main Mix fader.
The mixer has a separate AUX SEND 1 output, that
allows you to send the feed to your stage monitors.
Auxiliary 2 Effects bus
The Aux 2 FX bus is normally used to send an output
through the internal effects processor and onto the
main mix, and to send an output to external effects
via the AUX SEND 2 output.
To get signals onto the Aux 2 FX bus, rotate the AUX
SEND 2 controls located just below the EQ section of
each channel strip.
Unlike Aux Send 1, the levels going to Aux Send 2
are affected by the channel faders. (As the channel
faders are changed, the signal levels going to the
internal and external processors change.)
MAIN MIX BUS LEFT
MAIN MIX BUS RIGHT
MIC
MIC
MIC
MIC
BASS
MIC
GUITAR
KEYBOARD L
KEYBOARD R
MIC
MAIN OUT R
MAIN OUT L
AUX 1 MONITOR BUS
MIC
MIC
MIC
BASS
MIC
GUITAR
MIC
AUX SEND 1
MIC
KEYBOARD L
KEYBOARD R
AUX 2 EFFECTS BUS
MIC
MIC
MIC
BASS
MIC
GUITAR
AUX SEND 2
MIC
KEYBOARD L
KEYBOARD R
TO INTERNAL FX