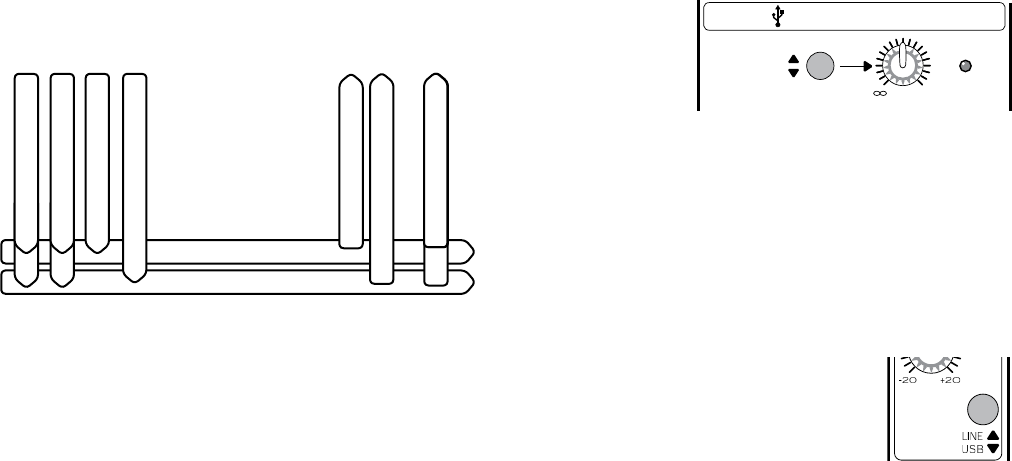
19
Three controls configure how the USB connection
will work in different scenarios:
USB Source switch:
This lets you
choose whether
your computer
is fed by the
main mix, or by a
prefader tap of subgroups 1-2.
USB Output Level: The selected channels of analog
audio pass through this control, allowing you to
adjust the gain if needed, and to stop the USB OL
(overload) LED from coming on.
Then the analog audio is converted to a serial
stream of digital data, and sent through the USB
cable to your computer where you can record it
into your DAW software (Digital Audio Workstation).
LINE/USB switch (CH 15/16): Two stereo
channels can return from your
computer to channels 15-16 by pushing
this switch at the top of the channel.
Recording Live
In a live situation, you can capture a recording of
exactly what the audience heard to your computer’s
hard drive, perhaps to burn a CD later.
Configuration:
• Set up your mixer for your live show as you normally
would. Be sure the USB SOURCE button is in the up
position; your computer will receive a copy of the
mixer’s stereo main mix signals.
• Adjust the USB Level Control so the USB OL
LED does not light during the sound tests or
performance, encores etc.
• Open your recording software of choice and
begin recording the Blend 16 USB input. This can
be done in either mono or stereo, depending on
how you are mixing your live show (there’s no
reason to record in stereo if you are mixing the
show in mono).
• Be sure the USB button is not engaged on channels
15-16 as this may cause a feedback loop with
some DAW setups.
Studio Recording and Overdubbing
In your studio, you can record two channels
or selected groups of channels to your computer,
playback your recording, and perform overdubs by
adding new material.
There are two different methods for monitoring the
recording:
• Direct monitoring (listening to the direct sounds as
you record).
• Software monitoring (listening through the
recording software). For example, you might want
to listen as you play your guitar through a new
“warm amp tones” software simulator plug-in.
Note: Use either monitoring method, but not both
at the same time, or you may hear an undesirable
echo of your recording.
Subgroups
The channel audio signals can also be sent to the
subgroups. These let you group together similar or
related sources.
For example, your drum kit microphones can be
sent to subgroups 1 and 2. The output from each
subgroup can be adjusted with its own SUB FADER,
assigned to the main mix, and/or sent out of the sub
output jacks for recording.
To get signals onto the subgroups, press the 1-2, or
3-4 buttons near the bottom of each channel strip.
Careful use of each channel’s PAN can create a
nice stereo image in subgroups 1 and 2, or in 3 and 4.
If you want a channel to only go to 1 (or 3), pan fully
left; for 2 (or 4), pan fully right.
To get subgroups onto the main mix, press the L
and/or R buttons above each SUB FADER.
Control Room and Phones Section
The control room section lets you select and
monitor the main mix, the CD/Tape player, subgroups
and listen to individual SOLOed channels, all without
interrupting the main mix. You can set up a separate
amplifier and speakers for a studio control room,
Uncle Ernie’s control shed, or headphones.
Solo
Any channels with their SOLO button engaged, will
have their signals sent (pre fader) to the control room
output and headphones for monitoring. This does not
affect the main mix, so your band can still play on
while you check individual channels and weed out
Mr. Out-of-Tune from the boy band.
USB and the Blend 16
One of the cool features of the Blend 16 is its
integrated USB input and output. Among other things,
this allows you to record your live shows, perform
recording sessions in your home studio, or use your
computer as a jukebox/band member during live
performances, with only your mixer, a computer and
a USB cable. No extra computer audio interface
hardware is needed.
Before you can get started, you may need to install
the drivers. See the instructions included on the Blend
16 software CD.
U
U
MAX
PHONESLAMP
BYPASS
EQ IN
FX OL
MAIN MIX
AUX1(MON)
POWER
PHANTOM 48V
1
MAIN
MIX
SUB
2
SUB
3
SUB
4
SUB
SUB ASSIGN
TO MAIN MIX
MASTER
AUX
SEND
CTRL RMPHONES
CD/TAPE IN
TO MAIN MIX
TO
MAIN
MIX
TO
AUX1
MON
INTERNAL EFFECTS
SUBS
1-2
SUBS
3-4
MAIN
MIX
CD/
TAPE
FX
BYPASS
SOURCE
SELECT
RUDE SOLO
0dB = 0dBu
OUTPUT LEVEL
USB
SOURCE
OL
MAX
MAX MAX
MAX
L R L R L R L R
1
MON
2
FX
+15
+15
FX
RETURN
+15
+15
15
-
15+
5
10
0
5
10
-
15
+15
5
10
0
5
10
STEREO GRAPHIC EQ
64Hz 125Hz 400Hz 1kHz 2.5kHz 8kHz 16kHz
16
LEVEL
SET
12
8
4
0
-4
-12
-24
FX
INPUT
LEVEL
SPRING
M DELAY
ST DELAY
CHORUS
REV + FLANGER
REV + CHORUS
REV + DELAY
FLANGER
TAPE REV
PLATE
SM HALL
LG ROOM
LG HALL
VOCAL 1
SM ROOM
VOCAL 2
VARIATIONS
MAIN MIX
SUBS 1-2
(PRE-FADER)
1
2
3
4
5
6
7
8
9
10
11
12
13
14
15
16
USB OUTPUT
10
dB
30
20
10
40
50
5
5
60
10
dB
30
20
10
40
50
5
5
60
10
dB
30
20
10
40
50
5
5
60
10
dB
30
20
10
40
50
5
5
60
10
dB
30
20
10
40
50
5
5
60
UUUUU
MIC
Subgroup 1
KICK MIC 1
SNARE MIC 2
OH LEFT MIC 3
OH RIGHT MIC 4
Subgroup 2
SUB 1 OUT
SUB 2 OUT
TO MAIN MIX
AUX
LINE
( )
1
2
15
13
16
MUTE
GAIN
14
CD/TAPE
15
16
MUTE
13
14
11
12
MUTE
11
12
9
( ) ( ) ( )
GAIN
10
MUTE
9
10
PANPANPAN
LINE LINE LINE
GAIN GAIN
PAN
EQ
MID
EQ
EQ EQ
L
FX
R
1
2
AUX
1
2
AUX
1
2
AUX
1
2
AUX
HIGH
LOW
MID
HIGH
LOW
MID
HIGH
LOW
MID
HIGH
LOW
( )
10
dB
30
20
10
40
50
5
5
60
10
dB
30
20
10
40
50
5
5
60
10
dB
30
20
10
40
50
5
5
60
10
dB
30
20
10
40
50
5
5
60
UUUU


