


12
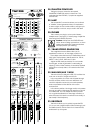
AUX SENDS and RETURNS
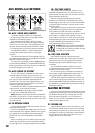
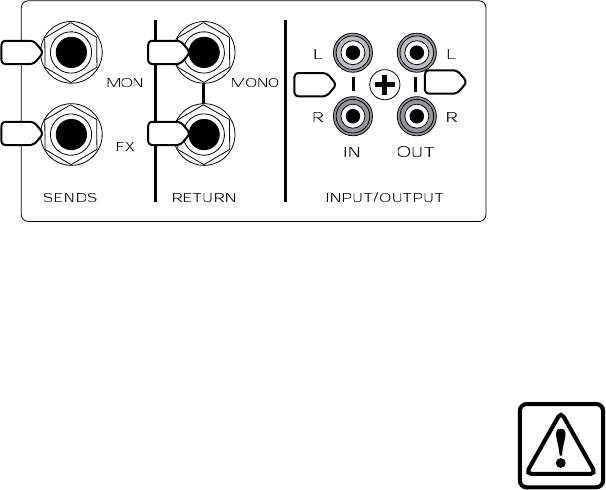
22. AUX 1 SEND MON OUTPUT
To create a stage monitor mix, connect this
1/4" TRS output to the input of your stage monitor
amplifier (or powered monitors).
Each channel’s AUX SEND 1 MON (11) knob
adjusts how much of the channel’s signal appears
on the AUX 1 bus. The AUX 1 bus carries the sum of
all those active channels whose AUX SEND 1 MON
(11) knobs are set to more than minimum position.
The MASTER AUX SEND 1 (43) knob allows you
to adjust the overall output level to your stage
monitors.
You can use the internal 7-band graphic EQ (31)
to equalize the monitor mix, by pressing in the MAIN
MIX/AUX 1 (MON) (32) switch.
This output to your stage monitors is not affected
by the channel FADERs (17) or MAIN MIX FADER (52).
This is a good thing, as the monitors are not affected
by level changes to your main mix.
23. AUX 2 SEND FX OUTPUT
This 1/4" TRS output is intended to patch into an
external effects processor, hence the name FX.
Each channel’s AUX SEND 2 FX (12) knob adjusts
how much of that channel’s signal appears on
the AUX 2 bus. The AUX 2 bus carries the sum of all
active channels whose AUX 2 SEND FX (12) knobs
are set to more than minimum.
The MASTER AUX SEND 2 (44) knob affects the final
output level to your external processor.
This output is affected by the channel FADERs
(17), but not the MAIN MIX FADER (52).
Note: Before the AUX 2 signals reach the MASTER
AUX SEND 2 FX (44) knob, a copy is tapped off to go
to the internal Effects processor, and from there onto
the main mix bus.
24. FX RETURN INPUTS
If you have an external effects processor, you can
plug it into these inputs.
The incoming signals are added into the main mix,
and a summed mono signal is added to the monitor
mix. Adjustment is provided by the fascinating FX
RETURN (45, 46) controls described in the Master
section.
When connecting a mono device (just one cord),
always use the left (mono) input and plug nothing
into the right input. The signal appears on both sides.
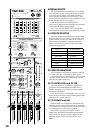
25. CD/TAPE INPUTS
This is where you connect the outputs of your
intermission entertainment. Any line-level mono or
stereo device can be used, such as: tape, DVD/CD
player, television audio, etc.
Signals coming into these inputs are routed
directly to the CD/TAPE TO MAIN MIX (49) control
and through to the main mix. You will need to MUTE
(14) all the other channels, if you just want to hear
the CD or Tape.
The signals can also be routed to the control room
and headphone when the control room/phones
source select CD/TAPE (42) switch is pushed in.
When connecting a mono device (just one cord),
you’ll need a “Y-splitter” RCA adapter. It turns a
mono output cord into two cords, so both the right
and left tape input jacks can be used. This adapter
is widely available. See Appendix B for more
information about RCA connectors.
Caution: There is a chance of feedback
if you have the tape inputs and outputs
connected to the same recorder, and the
recorder is in record mode.
26. CD/TAPE OUTPUTS
Use these RCA jacks to capture the entire
performance to tape. The output signal is a direct
copy of the main mix, as it appears at the MAIN
MIX (58) outputs and the USB (62) output to your
computer.
You could also use these outputs to connect
to the unbalanced RCA inputs of a home stereo
amplifier, if you had a mind to.
Do not use long runs of unbalanced cables, or
there might be signal degradation and noise. Try
using good quality cables as sold in Hi-Fi stores.
Use the tape player’s record-level control to set
up the correct levels for recording. Take care if you
use the MAIN MIX FADER (52) to adjust the levels, as
this will affect your MAIN MIX (58) outputs as well as
these Tape outputs.
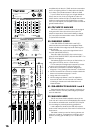
MASTER SECTION
So far, we have described the channels, and how
the signals from all of your microphones, instruments,
line-level sources and CDs or Tapes get onto the
main mix buses, subgroups 1 to 4, and the Aux
buses. Now we come to the Master section, that
controls what happens next.
27. POWER LED
This light glows when the mixer is turned on. If it is
off, the mixer will sulk and not work. Check that the
rear panel power switch is on, that the power cord
is plugged in, and any power strips or wall switches
are on. Also check if all the lights are out in your
neighborhood. You never know.
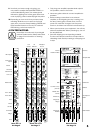
AUX
LINE
( )
1
2
15
13
16
MUTE
GAIN
14
CD/TAPE
15
16
MUTE
13
14
11
12
MUTE
11
12
9
( ) ( ) ( )
GAIN
10
MUTE
9
10
PANPANPAN
LINE LINE LINE
GAIN GAIN
PAN
EQ
MID
EQ
EQ EQ
L
FX
R
1
2
AUX
1
2
AUX
1
2
AUX
1
2
AUX
HIGH
LOW
MID
HIGH
LOW
MID
HIGH
LOW
MID
HIGH
LOW
( )
10
dB
30
20
10
40
50
5
5
60
10
dB
30
20
10
40
50
5
5
60
10
dB
30
20
10
40
50
5
5
60
10
dB
30
20
10
40
50
5
5
60
UUUU
22
23
24
24
25
26