


7
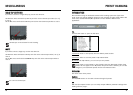
But you can also do a rough estimate: The first sound hitting the microphone is the direct
signal. This will have a level of 0 dB and an angle of 0 degrees.
The subsequent reflections to reach the microphone will be coming from the floor and the
ceiling. However we can leave them out since these reflections are very close to the direct
signal, they are very loud, and they often create an ugly comb filtering effect. The
reflections from the walls are next: The sound travels 2.8 meters before hitting the wall
between the source and the microphone. Then it travels another 2.8 meters from the wall
before finally hitting the microphone. That is a total of 5.6 meters, equaling 16 to 17 ms.
The angle is likely about 45 degrees left. Since the sound traveled nearly three times the
distance of the direct signal, you should turn the level down about 9 dB. Now add 40 %
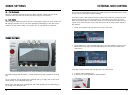
Shade to the tap and go to Shade-Settings. Here, you set the Diffusion to “Normal” and
make a dip in the high frequencies with the EQ.
Now you can create a new reflection just like this one, with only tiny variations in delay
time and level, and let it arrive from the other side – for instance, at an angle of 40
degrees from the right.
The next wave of reflections arrives from the wall behind the sound source. Some
reflections will hit the back wall first and then the sidewall before hitting the microphone.
Try to continue the calculations by yourself. Look at the illustration. If you think the room
needs a little extra, try to flip the phase on some of the taps. You can also try to add some
Feedback to some of the taps.
CCllaassssiicc eecchhoo –– wwiitthh aa ttwwiisstt
If you wish to simulate a classic tape-echo effect, you can benefit from the Shade
parameter. Create a delay with one tap, turn the Feedback up to 80 % and set Shade to
50%.
On the “Shade Settings” tab, set Diffusion to “Normal”. Next, turn the EQ’s high band and
low band down until you get a soft and diffused sound. This kind of delay will often blend
much better in a mix than clean, unaltered delays. And in echo-heavy genres like dub, you
will in fact get closer to the original tape-echo sound by using “Shade”.
Enjoy!
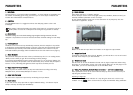
INTRODUCTION
6
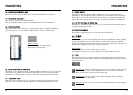
INTRODUCTION
and turn the phase for one of the taps, you will get the illusion of the sound coming from
behind you. Like other phase-turning tricks, this one works well, although it is not usable
in mono – the tap will simply disappear. But this trick can be employed even if the delay
times are not exactly the same. In that situation, you will get a more subtle 3D effect,
which also works in mono. In general, it is somewhat difficult to predict the results of
turning a tap’s phase. But if you for instance have a lot of very narrow delay times set up,
and they are creating a nasty comb filtering effect, try to flip the phase of some of the
taps. This will often clear up the problems.
CCrreeaattiinngg aa ““nnaattuurraall”” rroooomm aammbbiieennccee
If you wish to create a natural ambience, you need an application to calculate the
reflections (delay taps) in the room you wish to simulate. The reflections depend on the
room’s shape and size and on the position of both the sound source and the “listener”.
The color of the reflections will depend on the different surfaces in the room, and their
precise absorption coefficient. By calculating these reflections, you can create a very
natural audio environment. However most of us do not have such an application, so we
must rely on a few rules, a rough estimate – and our ears.
A few “rules of thumb”: Sound travels at 340 meters per second in air. We also know that
by doubling the distance to a sound source, its sound pressure level (SPL) will be reduced
by 50%.
Example:
The sound source is 5 meters away from you and its SPL is -4 dB. You now move the sound
source 5 meters further away, so it is now 10 meters away from you. The SPL will now be
-8 dB.
Furthermore sound pressure will decrease 0.03 dB/m just by traveling in air.
These facts can help us creating credible ambiences.
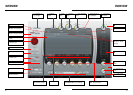
An example: The sound source is in a room 4 meters
wide and 8 meters long, and it is located 2 meters
from the back wall and centered between the two
sidewalls. The distance between the source and the
microphone is 4 meters. The exact calculation of all
the reflections in this example will take quite a bit of
time, a spreadsheet and good old Pythagoras to get
right.