


13
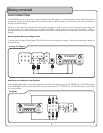
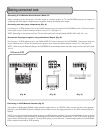
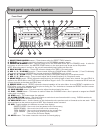
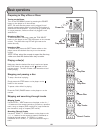
Front panel controls and functions
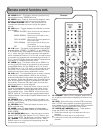
1. DIRECT TRACK ACCESS buttons – These buttons allow for DIRECT TRACK selection.
2. DISPLAY panel - Displays graphical information on the DVG-909K’s operating status.
3. POWER ON/STANDBY button - Use this button to turn the DVG-909K ON or put it in STANDBY mode. In order for
this button to turn the unit on, the MASTER POWER switch on the rear panel must be set to the ON position.
NOTE: When the power is turned on, the unit will automatically begin loading the first disc.
4. DECK A-B LED indicators – These LED indicators display which DECK is currently active.
5. MIC 1 / 2 / 3 VOLUME controls – These controls adjust the VOLUME levels of MIC channels 1, 2 and 3 individually.
Turn control clockwise to INCREASE and counter-clockwise to DECREASE the mic volume.
6. MIC 1 / 2 / 3 LOW controls – These controls adjust the LOW (bass) frequency of microphone vocals.
7. MIC 1 / 2 / 3 HI controls - These controls adjust the HI (treble) frequency of microphone vocals.
8. DELAY LEVEL control - DELAY adjusts the total beginning and ending length of each echo interval. As more DELAY is
applied to the ECHO effect, each ECHO interval will become longer in time. Turn clockwise to increase the DELAY level and
counter-clockwise to decrease the DELAY level.
9. REPEAT LEVEL control - REPEAT adjusts the interval repetition of the echo effect. As more REPEAT is applied to the
ECHO effect, more echo intervals will occur prior to fading out. Turn clockwise to increase the REPEAT level and counter-
clockwise to decrease the REPEAT level.
10. ECHO VOLUME control - Use this control to adjust the volume level of the echo.
11. PLAY / PAUSE button – This button is used to initiate disc PLAYBACK
when a disc is paused or stopped and PAUSE
a disc when it is playing.
12. STOP button - This button stops disc playback.
13. B-SCAN/F-SCAN buttons - Use these buttons to rewind and scan forwards within a song. B-SCAN rewinds the
song and F-SCAN scans forwards within a song.
14. PREV/NEXT buttons - Use the buttons to skip backwards to the previous track or forwards to the next track. PREV
skips backwards to the previous track and NEXT skips forwards to the next track.
15. OSD - Toggles between the different on-screen time displays.
SINGLE ELAPSED - How much time has passed on the current song
SINGLE REMAIN - How much time is left on the current song
TOTAL ELAPSED - How much time has passed on the current disc
TOTAL REMAIN - How much times is left on the current disc
OFF - Turns off the On Screen Display
16. MUTE button - This button mutes the music that is currently playing.
9
8
1
2
3
4
5
6
7
10
11
12
13
14
15
16
Front Panel