


26 Recording & Mixing Techniques
MD4—Owner’s Manual
Performing Auto Punch for Real
1. Press the [REC SELECT] button of the track that you want to record.
A circle flashes around the corresponding track indicator.
2. Press the [AUTO PUNCH I/O] button.
The Pre-Roll point is located automatically and the PRE indicator flashes. The REHE indicators
flash and the display shows
A.PNCHXREHE. The AUTO PUNCH and POST indicators appear.
This is Auto Punch Rehearse Standby mode.
3. Press the [REC] button.
The REC indicators flash and the display shows A.PNCH. This is Auto Punch Record Standby
mode.
If you’re monitoring the track via CUE, you’ll hear the signal that is assigned to the selected track.
4. Press the [PLAY] button to start the Auto Punch In/Out sequence.
Playback starts and the PLAY indicators light up. The REC indicators continue to flash, indi-
cating Play Record Wait mode.
At the specified IN point, punch in occurs (i.e., recording starts). The REC indicators stop flash-
ing and light up continuously. The IN indicator disappears.
If you’re monitoring the track via CUE, you’ll hear the existing sounds playback until the IN
point. After which you’ll hear the new sound that’s being recorded.
At the specified OUT point, punch out occurs (i.e., recording stops). The REC indicators go out
and the OUT indicator disappears.
Playback continues up to the Post-Roll point. Then the Pre-Roll point is located automatically,
and MD4 waits in Play Pause mode. Press the [PLAY] button to audition the punch in/out.
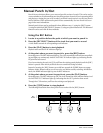
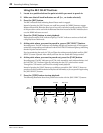
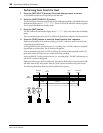
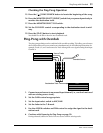
The following illustration shows the Auto Punch Record sequence.
Pre-Roll
Point
3
4
2
1
Play Record
Wait
Play
REC
SELECT
PLAY
Record
Post-Roll
Point
In
Point
Out
Point
REC
AUTO
PUNCH I/O
PRE
IN
OUT
POST
IN
OUT
POST
OUT
POST
POST