


52 MD4 & MIDI
MD4—Owner’s Manual
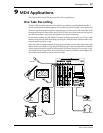
Using MIDI Clock
Setting the MIDI Sequencer
The MIDI sequencer must be set to receive and synchronize to an external MIDI Clock source.
Refer to your MIDI sequencer’s user manual for more information. Exact MIDI Clock operation
depends on what external synchronization features your MIDI sequencer supports. If it sup-
ports only basic MIDI Clock messages, then it will start playback at 00:00:00, but will not be
able to continue playback if the song is started from a position other than 00:00:00. In this case,
you will have to return to the beginning of the song each time you start playback on the MD4.
If your MIDI sequencer supports MIDI Clock and MIDI Song Position Pointers, you’ll be able
to start playback at any point in the song. In this case, your MIDI sequencer will locate to current
song position and play along in synchronization. Because MD4 can locate quickly, some MIDI
sequencers may not be able to synchronize immediately with MD4, especially when MD4 is
playing in A–B Repeat mode.
When MIDI Clock is on, MD4 stops playback at the end of each song.
MIDI Clock is turned off automatically if the Cue List or Program Play function is used.
Adding Meter Changes to a Tempo Map
1. Press the [UTILITY] button and use the [√] and [®] SELECT buttons to select
the MIDI Sync function.
2. Press the [ENTER] button.
The display shows OFFXMTCXCLK
3. Use the [®] SELECT button to select CLK.
4. Press the [ENTER] button.
The display shows MeterXTempo>
5. Press the [ENTER] button.
The display shows EDITXNEW
6. Use the [√] and [®] SELECT buttons to select EDIT or NEW.
EDIT allows you to edit the current Tempo Map. NEW resets all meter steps in the Tempo Map.
7. Press the [ENTER] button.
If you selected NEW, the display shows Ax001xx4/4. This is the first meter step in the Tempo
Map. If your song uses the same meter all the way through, you only need to set step A.
8. Use the [√] and [®] SELECT buttons to select the measure and time signa-
ture parameters, and the [–] and [+] DATA buttons to set them.
The measure can be set from 1 to 999. Pressing the [+] and [–] buttons together resets the mea-
sure to 000. Step A is always set to measure 1. When the measure parameter of a new step is
selected (000), pressing the [–] button selects the highest measure already in the Tempo Map.
The number of beats in a measure can be specified from 1 to 99. The type of beat can be specified
as 2, 4, 8, or 16. Pressing the [+] and [–] buttons together resets the number of beats or beat
type to 4.
9. Press the [ENTER] button.
The Tempo Map is sorted automatically and the cursor moves to the step letter. MASTER
appears on the display, indicating that MD4 is ready to generate MIDI Clock information.
10. Use the [–] and [+] DATA buttons to select other steps and set them as expla-