


MGP16X/MGP12X Owner’s Manual
12
Quick Start Guide
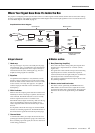
We’ll begin this guide by connecting a pair of speakers
and generating some stereo output. Note that the oper-
ations and procedures will vary somewhat according to
the input devices you are using.
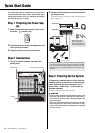
Step 1 Preparing the Power Sup-
ply
1. Make sure that the power switch of the unit is
set to the “ ” position (off).
2. Connect the socket of the included power cord
to the [AC IN] connector.
3. Plug the power cord into a power outlet.
Step 2 Connections
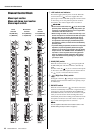
1. Turn all the faders and gain controls com-
pletely down.
2. Connect the microphones and/or instruments
you intend to use.
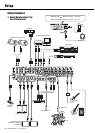
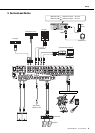
For details on making connections, refer to the “Setup Exam-
ples” on pages 8, 9.
Step 3 Powering Up the System
To prevent an unwanted burst of noise from the
speakers, power up the devices in the following
order: peripheral devices (instrument, micro-
phone, iPod) MGP mixer power amps (or
powered speakers).
Reverse this order when turning the power off.
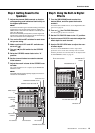
CAUTION
• If you are using condenser microphones that require phan-
tom power, turn the mixer’s +48V switch on before turning
on the power to the power amps or powered speakers. See
page 18 for details.
• Be sure to turn the power on/off in the order given in Step 3
above every time you use the device. Failure to do so may
result in loud noise bursts that can damage your equipment,
your ears, or both.
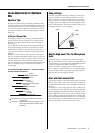
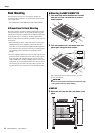
GAIN controls Power switch (rear panel)
Faders
DI
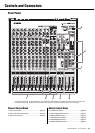
Front Panel
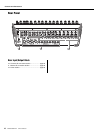
Rear Panel
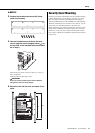
When using a con-
denser microphone,
set the +48V phantom
switch to ON (page 18).
Although electric guitars and basses can be connected directly
to the mixer’s inputs, the sound is likely to be thin and possibly
noisy. For best results with these types of instruments use a DI
box (direct box) or amp simulator between the instrument and
the mixer.