


42 • N3/N2 Owner’s Manual
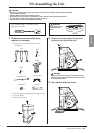
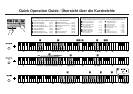
N3: Assembling the Unit
ENGLISH
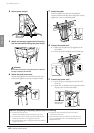
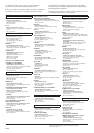
4 Set the piano upright.
5 Attach and securely tighten the left front leg
with the bolts while holding the piano firmly.
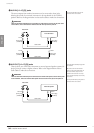
6 Attach the pedal brace rods.
Find the threaded bores on the bottom of the unit,
and securely tighten the screws to attach the rods.
7 Attach the pedal.
Insert the pedal brace rods into the pedal box
recesses and make sure they fit securely, then securely
tighten the screws to attach the pedal.
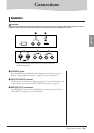
8 Connect the pedal cord.
8-1 Make sure the pedal cord is clipped into the
cord holder.
8-2 Insert the pedal cord plug into the pedal jack.
9 Connect the power cord.
9-1 Insert the power cord plug into the [AC IN]
connector.
9-2 Attach the cord holders to the instrument, then
clip the power cord into the holder.
Do not hold the control panel. Using excessive force on the panel
can result in damage to the instrument.
x 6
CAUTION
(the bottom of the
left side as seen
from the front)
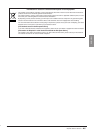
■ After completing the assembly, please check the following.
•Are there any parts left over?
→Review the assembly procedure and correct any errors.
•Is the instrument clear of doors and other movable fixtures?
→Move the instrument to an appropriate location.
•Does the instrument make a rattling noise when you shake it?
→Tighten all screws.
•Is the power cord inserted securely into the sockets?
→Check the connection.
•If the main unit creaks or is otherwise unsteady when you
play on the keyboard, refer to the assembly diagrams and
retighten all screws.
40