


253Chapter 5. PATTERN MODE
5
Step Recording
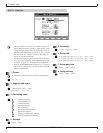
7. If you make an incorrect entry, you can delete it as
follows.
• To delete the last note you entered, press 5 (BkDelete).
The location pointer moves back to position it had just be-
fore you entered that note.
• To delete some other note: Move the location pointer to the
note’s location and press 6 (Delete). The QY700 de-
letes all notes that start at that position.
8. When you have finished making your entries, press
s to terminate the session and return to the PATCH
screen.
• Under step recording, note registration occurs when you
release the key(s), rather than when you press them. This
makes it easy to enter a block chord: you can pick out the
notes one by one and then release them all at the same time.
• You may want to enter rough velocity values only (using
only the f, p, and mp selections from the numeric keypad,
for example). You can then use one of the pattern jobs (such
as Crescendo or Modify Velocity) to adjust the values later.
(See explanations starting on page 256.)
• Step recording supports entry of note data only. You can
add other types of data using the Phrase Edit Insert func-
tion.
Step recording of phrases (PATTERN mode) is essentially the same
as step recording of songs (SONG mode). In particular, the re-
cording procedures and screen parameters are the same. For more
detailed operational information, refer to the explanation of song
recording that begins on page 106.
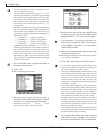
5. Phrase Recording
• You use this recording mode to create a recording one note
at a time, setting appropriate values for each note’s length,
velocity, and so on.
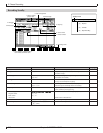
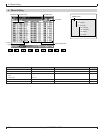
1. Starting from the PATCH screen, press e.
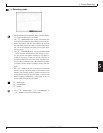
• The QY700 displays the Recording Standby page. The RE-
CORDING indicator comes on.
2. Press 6 (STEP) to select step recording.
3. Press p.
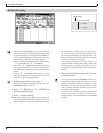
▼ The PLAY indicator comes on. The screen displays the step
recording page.
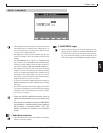
4. Move the location pointer to the location where you
want to enter a note, using n/y, the data dial, or
the shuttle dial. (To jump to a distant measure: Press
d[D1] to move the cursor to the location-setting
area, then enter the measure number with the numeric
keypad.)
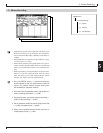
5. Set the step time, velocity, and gate time. To set each
value, press the corresponding key (d [D2] for
step time, d [D3] for velocity, d [D4] for gate
time) to move the cursor to the entry area, then enter
the value using the data dial, n/y, or numeric
keypad.
6. Now enter the note itself. You can select the note us-
ing either the microkeyboard or an external MIDI key-
board. If you want to enter a rest, press the
m(REST) key. If you want to enter a tie, press the
s (TIE) key.
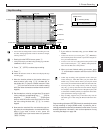
8. Back delete
SHIFT F1 F2 F3 F4 F5 F6 SHIFT EXIT
7. Piano roll
6. Gate time
5. Velocity
4. Step time
2. Location pointer
3. Location1. Beat graph
9. Delete
6Step Recording
pPATCH
e
Recording Standby