


12 EUROPOWER PMP1000/PMP4000/PMP6000 User Manual
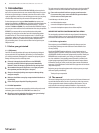
Connectors2.4.1
Use the (55) CD/TAPE INPUT jacks (RCA) to connect an external stereo signal,
such as a CD player, tape deck or other line-level sources.
(56) The VOICE CANCELLER filters vocal-specific frequencies from
the CD/TAPE INPUT signal. This function can be used for
karaoke, i.e. you can remove the vocals from a song and then
sing along with the music yourself.
The (57) CD/TAPE OUTPUT provides the line level stereo signal
(e.g. for a DAT recorder).
If the CD/TAPE OUT signal is connected to a recording machine whose ◊
output signal is returned to the CD/TAPE IN, feedback can occur
when you activate the record function on the recording machine.
So, disconnect the CD/TAPE IN from the recording machine before you
start recording or set the CD/TAPE input signal to zero!
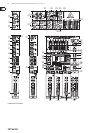
PMP1000: The MAIN OUT jacks allow you to send the main line level signal (58)
to an external amplifier, when, for example, you want to use the mixer
and effects section. The PMP4000 and PMP6000 have two separately
controllable line level MAIN outputs (59) (MAIN 1/2).
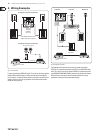
Connect your monitor power amps or active monitor speakers to the (60)
MON 1/2 SEND to monitor the signal mix created with the MON controls or
to route it to the musicians on stage.
The PMP Series comes with a POWER AMP INSERT connection that is (61)
provided for various applications. This connection enables you to use the
power amplifier of the device to amplify the output signal of another
preamp. For example, it is possible to connect a larger mixer or preamp
output (line signal) of an instrument amplifier. In this case, you only need an
unbalanced, mono jack cable.
Furthermore, it is possible to use the POWER AMP INSERT as a conventional
insert to add a compressor or graphic equalizer to the signal path,
for instance. Here, a balanced, stereo jack cable is required and the
assignment of tip and ring needs to be observed according to Figure 4.5
(see Chapter 4.2 “Audio Connections”). In this case, the ring is the so-called
Send, which is connected to the input of the additional device, and the
tip is referred to as Return, which is connected to the output of the
additional device.
Lastly, it is possible to tap the output signal of the device’s mixer section
from the POWER AMP INSERT in order to use a second, external power
amp. A balanced, stereo jack cable is required with the ring (not the tip)
connected to the input of the external power amp. If you want to use the
internal and external power amps at the same time, just wire the connector’s
ring and tip together.
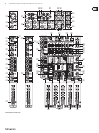
The (62) FOOTSWITCH jack is for a standard footswitch. You can activate an
“effect bypass”, thereby muting the effects processor. Use a dual foot switch
for the PMP6000, so that you can enable/disable FX1 and FX2 independently
of each other. In this case, the tip of the ¼" plug controls FX1, and the
ring FX2.
PMP4000/PMP6000: The (63) MONO OUT is for connecting a subwoofer.
The PMP6000 has the additional possibility of setting the low-frequency
range for the subwoofer.
Use the SUB FILTER control (50) to adjust the frequency.
The (64) FX SEND connector can be used to route the FX SEND signal from the
input channel, for example, to the input of an external effects device.
Since the PMP6000 has two FX controls per input signal (see (12)),
both FX SEND 1+2 are present at one jack.
Please note: The SEND signal is in parallel with the FX SEND jacks and ◊
with the effects processor, so that both can be controlled together by
one control.
For the FX signals, use a ¼" stereo plug connected as follows: ◊
FX1 = tip; FX2 = ring
The (65) PHONS/CTRL connector allows you to connect a pair of stereo
headphones or an (active) monitor speaker.
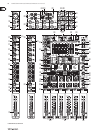
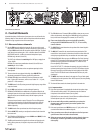
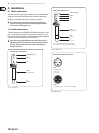
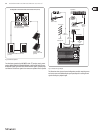
Rear panel2.5
The mains connection is via a standard (66) IEC receptacle. An appropriate power
cord is supplied with the unit.
FUSE HOLDER(67) . Before connecting the unit to the mains, ensure that
the voltage setting matches your local voltage. Blown fuses should only
be replaced by fuses of the same type and rating. Please also read the
information given in the “Specifications”.
Use the (68) POWER switch to put your PMP into operation. The POWER switch
should always be in the “Off” position before connecting your unit to
the mains.
Please note: The POWER switch does not fully disconnect the unit from ◊
the mains. Unplug the power cord completely when the unit is not used
for prolonged periods of time.
SERIAL NUMBER(69) .
This is where you find the cooling fan of the unit.(70)
The PMP6000 has two cooling fans.
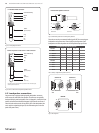
OUTPUT A (LEFT)(71) provides either the left stereo main signal or the monitor
signal in mono, depending on the operating mode selected (see (27)).
NEVER use this output in bridged mono mode.
OUTPUT B (RIGHT/BRIDGE)(72) provides either the right stereo main signal,
the main mix signal (mono) or the bridged mono signal, depending on the
operating mode selected.
In BRIDGE mode always connect only one loudspeaker with an ◊
impedance of at least 8 Ω to the OUTPUT B jack! NEVER use OUTPUT A in
BRIDGE mode!
In all other operating modes the impedance of the connected ◊
loudspeaker must not fall below 4 Ω.
Digital Effects Processor3.
24-BIT MULTI-EFFECTS PROCESSOR
This built-in effects module produces high-grade standard effects such as
reverb, chorus, flanger, delay and various combination effects. The integrated
effects module has the advantage of requiring no wiring. This way, the danger
of creating ground loops or uneven signal levels is eliminated at the outset,
completely simplifying the handling. These effect presets are designed to be
added to dry signals.
Turn down the FX controls in those channel strips whose signals you ◊
don’t wish to process.