


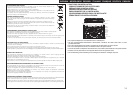


4
Before use
Connections
Basic
operations
Installing and setting up
supplied software
USB settings
Troubleshooting
Index
Specifications
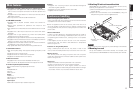
System diagram
Other
functions
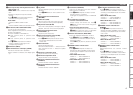
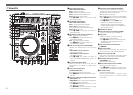
Part names and
Functions
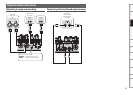
u Auto loop and loop size adjustment buttons
(AUTO LOOP –/+)
• AUTO LOOP button switches auto loop ON/
OFF.
• –/+ buttons adjust the loop size and beat
interval.
• Hold o SHIFT and press these buttons to
enter the following setting mode.
AUTO LOOP :
• Opens the BEAT JUMP window.
–/+ :
• Performs BEAT JUMP at the set beat interval.
i CUE button (CUE1/CUE2/CUE3/CUE4)
You can set up to 8 CUE points.
Select registered CUE points by switching the
sample mode ON/OFF.
• Function available in TRAKTOR Pro.
On: Sets CUE1–4 points or performs CUE
playback.
Off: Sets CUE1–4 points or performs CUE
playback.
• Hold o SHIFT and press the individual
buttons to delete the settings for the
corresponding CUE point.
o Shift button (SHIFT)
Q0 CUE switch button and display (SAMP.)
The button switches CUE1–4/CUE5–8.
• When CUE5–8 is selected, the display lights
up.
Q1 Jog wheel
Searches playback points or performs the bend
operation.
• Hold o SHIFT and turn this to search for the
list.
Q2 Fast-forward/Fast-rewind buttons
(6/7)
Q3 CUE button (CUE)
Sets the current CUE point and stutters the
current CUE point when pushed repeatedly.
Q4 Play/Pause button (1/3)
Push once to start playback, once again to pause
playback, and once more to resume playback.
Q5 Pitch bend adjustment buttons
(PITCH BEND –, +)
Adjust the pitch temporarily.
Q6 Beat synchronization button (SYNC)
Performs auto beat matching.
• Hold o SHIFT and press this button to set
the currently selected deck to the SYNC
master deck.
Q7 Pitch fader slider
Adjusts the playback pitch.
Move the knob toward the “–” direction to slow
down the pitch and the “+” direction to speed
up the pitch.
Q8 Parameter1 adjustment knob
Adjusts the filter cut off frequency.
Q9 Parameter2 adjustment knob
Adjusts the filter cut off frequency.
W0 Parameter1 ON/OFF switch button
(PARAM.1)
Switches the filter function ON/OFF.
W1 Parameter2 ON/OFF switch button
(PARAM.2)
Switches the filter function ON/OFF.
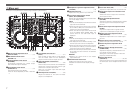
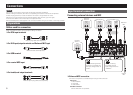
Top panel
W2 Load button (LOAD A/B)
Loads the file selected by the track selection
knob to DECK A or DECK B.
• Hold o SHIFT and press this button to load
the file to DECK C or DECK D.
• Changes into duplicate function in TRAKTOR
LE.
W3 Track selection knob (SEL.)
• Turn the track selection knob:
Scrolls through the browser list. Hold o
SHIFT and turn the knob to scroll through the
browser tree.
• Press the track selection knob:
Loads the file selected in the browser list.
Hold
o SHIFT and
press
this button to open/close
the directory (folder) in the browser tree.
W4 Window switch button (BACK/FWD)
Switch the displayed FAVORITES windows.
• Hold o SHIFT and press BACK to load the
file selected with the track selection knob to
the preview player.
Press FWD to play back or pause the preview
player.
W5 RECORD window switch button
(RECORD)
• Hold o SHIFT and press this button to
allocate next MIDI CHANNEL to each DECK
according to the ON/OFF state of the DECK
CHG. mode.
• When DECK CHG. is blue
• DECK A ......... MIDI CHANNEL 13
• DECK B ......... MIDI CHANNEL 15
• When DECK CHG. is red
• DECK C ......... MIDI CHANNEL 14
• DECK D ........ MIDI CHANNEL 16
W6 EFX window switch button (EFX)
• Hold o SHIFT and press this button to
allocate next MIDI CHANNEL to each DECK
according to the ON/OFF state of the DECK
CHG. mode.
• When DECK CHG. is blue
• DECK A ........... MIDI CHANNEL 9
• DECK B ......... MIDI CHANNEL 11
• When DECK CHG. is red
• DECK C ......... MIDI CHANNEL 10
• DECK D ........ MIDI CHANNEL 12
W7 SAMPLE window switch button
(SAMPLE)
• Hold o SHIFT and press this button to
allocate next MIDI CHANNEL to each DECK
according to the ON/OFF state of the DECK
CHG. mode.
• When DECK CHG. is blue
• DECK A ........... MIDI CHANNEL 5
• DECK B ........... MIDI CHANNEL 7
• When DECK CHG. is red
• DECK C ........... MIDI CHANNEL 6
• DECK D .......... MIDI CHANNEL 8
W8 BROWSE window switch button
(BROWSE)
Maximizes/minimizes the browser window
display.
• Hold o SHIFT and press this button to
allocate next MIDI CHANNEL to each DECK
according to the ON/OFF state of the DECK
CHG. mode.
• When DECK CHG. is blue
• DECK A ........... MIDI CHANNEL 1
• DECK B ........... MIDI CHANNEL 3
• When DECK CHG. is red
• DECK C ........... MIDI CHANNEL 2
• DECK D .......... MIDI CHANNEL 4