


6
Before use
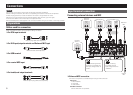
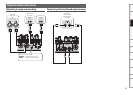
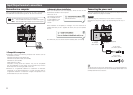
Connections
Basic
operations
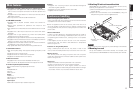
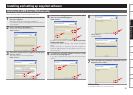
Installing and setting up
supplied software
USB settings
Troubleshooting
Index
Specifications
System diagram
Other
functions
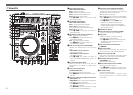
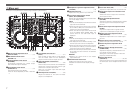
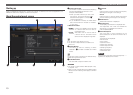
Part names and
Functions
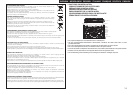
Top panel
Q8 Parameter1 adjustment knob
The function differs according to the window.
• BROWSER : Selects the video transition type.
• SAMPLER : Adjusts the sample level for
DECK A.
• EFFECTS : Adjusts the parameter 1 for the
selected effect.
• RECORD : – (Not available)
Q9 Parameter2 adjustment knob
The function differs according to the window.
• BROWSER : Selects the video effect type.
Hold o SHIFT and turn the knob
to adjust the video effect depth.
• SAMPLER : Adjusts the sample level for
DECK B.
• EFFECTS : Adjusts the parameter 2 for the
selected effect.
• RECORD : – (Not available)
W0 Parameter1 ON/OFF switch button
(PARAM.1)
The function differs according to the window.
• BROWSER : Switches the video transition
function ON/OFF.
• SAMPLER : Plays back the sample for DECK
A. Hold o SHIFT and press this
button during sample playback
to play back the sample from
the beginning again (Stutter
function).
• EFFECTS : Enables the effect selected for
DECK A.
• RECORD : – (Not available)
W1 Parameter2 ON/OFF switch button
(PARAM.2)
The function differs according to the window.
• BROWSER : Switches the video effect ON/
OFF.
• SAMPLER : Plays back the sample for DECK
B. Hold o SHIFT and press this
button during sample playback
to play back the sample from
the beginning again (Stutter
function).
• EFFECTS : Enables the effect selected for
DECK B.
• RECORD : – (Not available)
W2 Load button (LOAD A/B)
The function differs according to the window.
• BROWSER : Loads song on left or right deck.
• SAMPLER : Selects sampler deck.
• EFFECTS : Selects effect deck.
• RECORD : – (Not available)
W3 Track selection knob (SEL.)
Turn or press the knob to select the file.
The function differs according to the window.
• Turn the track selection knob
• BROWSER : Scrolls through the file/folder
list.
• SAMPLER : Selects the sample.
• EFFECTS : Selects the effect.
• RECORD : – (Not available)
• Hold Q0 SAMP. and operate this knob to
select samples.
• Press the track selection knob
• BROWSER:
• Songs : Adds songs to the play list. Hold
o SHIFT and press this button
to add songs to the side list.
Function only available in Virtual
DJ Pro.
• Folders : Selects the folders.
Hold o SHIFT and press this
button when sub-folders exist
to open/close sub-folders within
the browser tree.
• SAMPLER : Plays back the sample. Hold
o SHIFT and press this button
during sample playback to
play back the sample from
the beginning again (Stutter
function).
• EFFECTS : Switches the effect ON/OFF.
• RECORD : Starts/stops recording.
Hold o SHIFT and press this
button to start/stop recording
next track.
W4 Window switch button (BACK/FWD)
The function differs according to the window.
• BROWSER :
• Virtual DJ Pro: Switches among folders,
songs, playlist and the side
list.
• Virtual DJ LE : Switches among folders and
songs.
• SAMPLER : Selects the sample.
• EFFECTS : Switches between sound
effects, video effects, and video
transition.
• RECORD : – (Not available)
W5 RECORD window switch button (RECORD)
Displays the RECORD window.
• Hold o SHIFT and press this button to
allocate next MIDI CHANNEL to each DECK
according to the ON/OFF state of the DECK
CHG. mode.
• When DECK CHG. is blue
• DECK A ......... MIDI CHANNEL 13
• DECK B ......... MIDI CHANNEL 15
• When DECK CHG. is red
• DECK C ......... MIDI CHANNEL 14
• DECK D ........ MIDI CHANNEL 16
W6 EFFECTS window switch button (EFX)
Displays the EFFECTS window.
• Hold o SHIFT and press this button to
allocate next MIDI CHANNEL to each DECK
according to the ON/OFF state of the DECK
CHG. mode.
• When DECK CHG. is blue
• DECK A ........... MIDI CHANNEL 9
• DECK B ......... MIDI CHANNEL 11
• When DECK CHG. is red
• DECK C ......... MIDI CHANNEL 10
• DECK D ........ MIDI CHANNEL 12
W7 SAMPLE window switch button (SAMPLE)
Displays the SAMPLER window.
• Hold o SHIFT and press this button to
allocate next MIDI CHANNEL to each DECK
according to the ON/OFF state of the DECK
CHG. mode.
• When DECK CHG. is blue
• DECK A ........... MIDI CHANNEL 5
• DECK B ........... MIDI CHANNEL 7
• When DECK CHG. is red
• DECK C ........... MIDI CHANNEL 6
• DECK D .......... MIDI CHANNEL 8
W8 BROWSE window switch button
(BROWSE)
Maximizes/minimizes the browser window
display.
• Hold o SHIFT and press this button to
allocate next MIDI CHANNEL to each DECK
according to the ON/OFF state of the DECK
CHG. mode.
• When DECK CHG. is blue
• DECK A ........... MIDI CHANNEL 1
• DECK B ........... MIDI CHANNEL 3
• When DECK CHG. is red
• DECK C ........... MIDI CHANNEL 2
• DECK D .......... MIDI CHANNEL 4
NOTE
• The MIDI channels should not be changed
otherwise the controller will not function correctly
with Virtual DJ.
• It expects DECK A DECK D of the controller to
be MIDI channels 1 MIDI channels 4.