


B-DEC 3O
17
fender.com
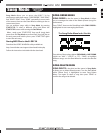
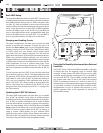
Saving and Renaming Changes
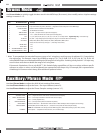
Adjusting the AUX Input Level for CD/MP3 Player Use
Balancing the Front and Rear Bass Inputs
"Aux Level" is the first item in the Aux menu and is an attenuator for any device plugged into AUX IN, the RCA jacks located on the
B-DEC 30’s rear panel. Although the AUX IN source will likely have its own volume control, Aux Level provides additional volume
control to help balance an external music source with your bass.
"FR Bal," the second item in the Aux menu, is a balance control between the front and rear instrument inputs. Since basses can vary
greatly in output, this blend control can favor either input to help balance the overall sound. This comes in handy when jamming
with friends or in a teacher/student situation.
Turn "FR Bal" clockwise to favor the front input; counter clockwise to favor the rear input. This is a global setting applied to all
presets (not saved to individual presets).
The B-DEC™ 30 has presets divided into "P" (permanent)
and "U" (user) sections. The P section gives you factory-
programmed music patterns, amp types, and effects; these
can be altered, but alterations can not be saved in the P
section. Attempts to save alterations in the P section will
relocate your changes to the U section, where they can be
saved.
Any time you alter any aspect of the preset currently in use,
the "SAVE" button (next to the large Data Wheel) will blink as a
reminder that you have made a change but have not saved it.
If you leave that preset without saving, changes will be lost.
To save a preset to which you have made changes, simply
push the "SAVE" button. The default save location will be the
current preset if in the "U" section (U00, U01, U02, etc.), or the
corresponding "U" location if in the "P" section (i.e., P01 saves
to U01). To confirm you wish to save in that location, press
"SAVE" again.
If you would like to save it to a different location, turn the
large Data Wheel to the desired user preset and press "SAVE"
a second time.
To rename a preset so you can more easily recognize it, press
the “UTILITY” button to enter the utility menu. Scroll down
to the second menu item listed, “Edit Name,” and you will
notice a hammer icon with the phrase “Turn 2 Edit.” Turn
the large Data Wheel and you will instantly enter a screen
with the current name of the preset listed. Pushing the
“UTILITY” button will move the cursor through each letter of
the current name; turning the large Data Wheel will change
that letter. Holding the “UTILITY” button down and turning
the large Data Wheel will move you through each letter of
the current name more quickly. Once you’ve renamed the
preset, press “SAVE” once to determine where you would like
to save the preset; press it a second time to confirm the save.
Pressing “EXIT” will cancel the process and take you out of the
renaming screen.