


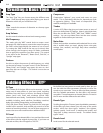

B-DEC 3O
5
fender.com
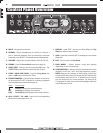
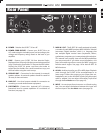
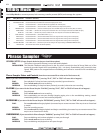
N. POWER - Switches the B–DEC™ 30 on-off.
O. POWER CORD SOCKET - Connect your B–DEC 30 to an
A/C outlet using the included power cord according to the
voltage and frequency ratings listed on the back of you
amplifier.
P. FUSE - Protects your B–DEC 30 from electrical faults.
Replace a blown fuse only with the type and rating specified
(see pg 23) below the fuse holder. To remove the fuse holder:
Unplug the B–DEC 30 power cord from the socket to
expose the fuse holder. Use a small screwdriver to pry out
the fuse holder using the notch on top.
Q. SPEAKER OUT - Connection for the internal (or external)
speaker cabinet. An external speaker should be rated for
30 watts, 8 ohms minimum.
R. LINE OUT - Line level output suitable for connection to
recording or sound reinforcement equipment.
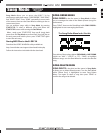
S. FOOTSWITCH
- Connect the (optional) ULT-4 4-button
footswitch here for remote operation of a multitude of
functions (see page 13).
T. MIDI IN / OUT
- The B–DEC 30 is well equipped to handle
a number of useful MIDI functions. MIDI stands for “Musical
Instrument Digital Interface” which is a language that
lets multiple digital musical items (keyboards, effects,
synthesizers, computers, etc.) communicate with each other.
This manual can’t possibly cover all the MIDI possibilities
you may encounter. If you desire more information, visit
http://www.midi.org online or search for “MIDI” using your
favorite search engine. See page 18 for basic B–DEC 30
MIDI functions.
U. AUX IN - Auxiliary input for your CD or MP3 player. Playback
music through your B–DEC 30 for accompaniment or to
learn songs. Connect the output on your player (line out,
headphones, etc.) to the AUX IN RCA jacks using the proper
cable or adapter. You can adjust the auxiliary input level
through the Aux Mode menu (see page 10).
V. INPUT - An extra input for an instructor or a friend to plug
into. You can adjust the balance between this input and
the front input in the Aux Mode menu (see page 10).
Rear Panel