


3
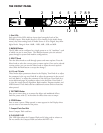
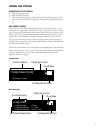
the FRoNt PANeL
1. Gain LEDs
Each pair of Gain LEDs indicate input signal strength of each of the
PCM96’s inputs. If the Audio Source is set to Analog (in the Audio Setup
menu), they show analog levels. If Audio Source is set to Digital, they show
digital levels. Range is from -18dB, -12dB, -6dB, -3dB, and 0dB.
2. MACHINE Button
The PCM96 can be configured as a single system or as 1-4 “machines”, each
of which can run its own preset. The Machine button cycles the selected
preset through its system and machine configurations.
3. SELECT Knob
Turn the Select knob to scroll through presets and menu options. Press the
Select knob to select the current preset or menu option. Once you’ve selected
a menu option, you can turn the Select knob to adjust the menu option’s
value (Press the Back button to accept the change.)
4. A, B, and C Knobs
These knobs adjust parameters shown in the Display. Turn Knob A to adjust
the parameter in the top row, Knob B to adjust the parameter in the second
row, and Knob C to adjust the parameter in the third row. Press Knob A to
access additional pages of parameters when in the Soft Row. Press Knob C
to view the current preset’s Algorithm, Bank number, Program number, and
MIDI channel. These knob also have additional context-sensitive functions
when pressed.
5. TAP/TEMPO Button
Press two or more times to set tempo for delays and modulated effects.
Look for presets with (T) in the name for effects that react to tempo.
6. STORE Button
Press to store a preset. When pressed, a menu appears in the Display where
you can enter a new name for the preset.
7. Compact Flash Card Slot
Insert Compact Flash card here.
8. FLASH BUSY LED
This LED lights when the Compact Flash card is being read or written to.
Do not remove the Compact Flash card when this LED is lit.
FLASH BUSY
SELECT
TAP/TEMPO
LOAD
MACHINE
BACK
STORE
COMPARE
1 2
131211
987654
3
10