


DX810 – 22
Now let’s look at an example to see how the
rules apply in a practical application.
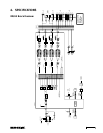
A Three Room Combination
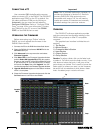
In this example, Outputs A, B, and C provide
separate mixes for three rooms, which are
separated by dividing walls that can be folded back
to create one large room.
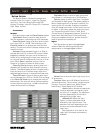
Initial Setup
1. A microphone from Room A is connected to
Input 1, a microphone from Room B is connected to
Input 2, and a microphone from Room C is
connected to Input 3.
2. Input 1 is routed to Output A (Room A) via
crosspoint 1A.
3. Input 2 is routed to Output B (Room B) via
crosspoint 2B.
4. Input 3 is routed to Output C (Room C) via
crosspoint 3C.
So far we have one mic in each room that is
routed to its room only. Now set the inputs and
outputs to nominal levels appropriate for the gain
structure of the system.
Secondary Setup for Room Combining
We want to be able to fold the walls back and
combine rooms A and B, rooms B and C, or
combine all three rooms into one large room. We
will create two combinations: C1 will combine rooms
A and B, and C2 will combine rooms B and C. To
combine all three rooms, activate both C1 and C2.
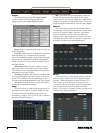
5. Assign each output A, B, and C to its own
control group. Let’s use groups 1, 2, and 3.
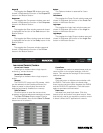
6. Assign each crosspoint to its own control group.
For this example, let’s use the following:
Crosspoint Group
1A 4
2B 5
3C 6
Tip: Don’t forget to deselect the group select
button when you are finished assigning the outputs
and crosspoints to the groups! You can click the
Group button to verify that you have assigned the
outputs and crosspoints correctly.
7. Set the group levels to a nominal level (or unity
gain).
Now we have assigned each crosspoint and
output to a control group, to satisfy one of the
combine rules (rule number 1).
Next we will add the inputs that we want to
appear at each output when each combination is
active.
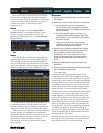
8. Select Output A and adjust crosspoints 2A and
3A so they can be heard in Output A. This puts
Room B and Room C mics into Room A output.
9. Select Output B and adjust crosspoints 1B and
3B so they can be heard in Output B. This puts
Room A and Room C mics into Room B output.
10. Select Output C and adjust crosspoints 1C and
2C so they can be heard in Output C. This puts
Room A and Room B mics into Room C output.
Notice that we haven’t assigned these
crosspoints to groups. This ensures that the extra
inputs added to each output will only be heard
when the combination is active (rule number 3).
Note that the added inputs can be heard in all the
outputs until the combination is created, activated,
and then deactivated. That is when the combine
rules take effect.
Assign Combinations
Now we’ll create the combination to allow the
inputs for rooms A and B to be heard in both A and
B outputs when C1 is active.
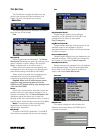
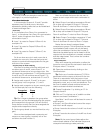
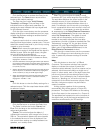
11. Open the combine view by clicking on the
Combine button.
Tip: Each row of combine buttons (C1-C16) is
associated with the output at the end of the row.
There is no association with the inputs or input
faders at the bottom (vertically). Each output can be
assigned to none, one, or more combinations. The
last row of reddish colored combine buttons are
used to activate individual combinations.
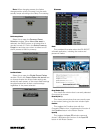
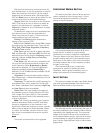
12. Create Combination 1 by clicking on C1 for
Outputs A and B.
13. Click on C1 in the last row of reddish combine
buttons to activate Combination 1.
Now Mics 1 and 2 room will be heard in rooms A
and B outputs.
• Groups 1 and 2 are linked and control the output
level into A and B outputs.
• Group 4 controls the volume of mic #1 into A and
B outputs.
• Group 5 controls the volume of mic #2 into A and
B outputs.
Note: All the control group faders adjust the
volume levels relative to the individual output and
crosspoint level settings made previously.