


8
Assigning MIDI Messages to the Controls
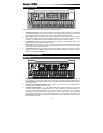
Editing Axiom AIR's MIDI configuration all starts with the Edit button. Press it to enter Edit Mode. It will flash
to indicate it is in Edit Mode. To exit Edit Mode, press it a second time.
To assign a specific MIDI message to a physical control:
1. Press the Edit button. It will flash red, and all controls
will stop sending messages.
2. Select the control to assign by moving or pressing it.
The selected control's bank and control number will
appear in the LCD.
3. Enter Parameter Assign Mode by pressing the
Param Assign key. The MIDI message currently
assigned to control will appear in the LCD.
4. Select the desired MIDI message for this control by
using one of the methods described in the next
section, To choose a MIDI message to output.
5. Press the center Directional button to save the new
assignment.
To choose a MIDI Message to Output:
Directional buttons:
1. Select the type of MIDI message you want to output by using Knob 8 or the up and down Directional
buttons.
2. Use the left and right Directional buttons to access sub-parameters for that MIDI message, if any.
The sub-parameter name and its current value will appear in the LCD.
Note: When the LCD displays a "right" arrow (
) next to the parameter name, it means it has sub-
parameters, which you can also edit. Use the left and right Directional buttons to access these sub-
parameters.
3. Increase or decrease the displayed value by using the up and down Directional buttons.
4. Press the center Directional button to confirm your choice and return to the sub-parameter list.
Knobs:
1. Use Knob 8, the numerical keys on the keyboard, or the up and down Directional buttons to select
(1) the type of MIDI message you want to output, (2) the sub-parameter to edit, and (3) that sub-
parameter's value.
2. Press the center Directional button to confirm your choice and return to the sub-parameter list.
Identifying Control Assignments
It can be helpful to see which hardware control is assigned to which software parameter.
To check the control assignment of a hardware control:
1. Press and hold the Identify button, or double-press it to "latch" it on. All control output from Axiom AIR
will be temporarily halted, and the button will flash red.
2. Manipulate the control you want to identify. The assigned parameter and its current setting will appear
on the LCD.
3. To go back to normal operation, release the Identify button or, if you latched it, press it once again.
Velocity Curves
The keyboard and trigger pads on Axiom AIR are velocity-sensitive; playing with more force results in a
higher volume, while playing with less force results in a lower volume. This dynamic range gives your
performance a more natural sound and feel. You can vary this sensitivity by selecting a velocity curve,
tailoring the response to your particular playing style.
To select a velocity curve:
1. Press the Edit button. It will flash red.
2. Press the Vel Curve key on the keyboard. Key Velocity will appear on the LCD.
3. To switch between Key Velocity and Pad Velocity, press the Vel Curve key again or use the up and
down Directional buttons. Press the center Directional button to edit it.
4. Use the numerical keys (0–9) to select the desired
velocity curve, and then press the Enter key on the
keyboard. Alternatively, you can use the up and down
Directional buttons and then press the center Directional
button.
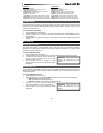
The velocity curve settings are described in the following
chart:
IMPORTANT: Exiting Edit Mode or
pressing the Cancel key on the
keyboard will automatically save your
changes.
• When selecting Aftertouch in Edit Mode,
press a key that does NOT have a
secondary Edit Mode function (i.e., the
keys without writing above them).
• To exit Edit Mode and discard any new
settings, press the Cancel key on the
keyboard or the Edit button.
• For a complete list of available MIDI
messages and sub-parameters, please
see this manual's Appendix.