


VOCAL
™
100
Congratulations on your purchase of the Vocal
™
100 stereo vocal floor processor. The Vocal 100 borrows
multiple features from some of Peavey’s top rackmount effects units and packs them into a convenient stage
pedal. This gives the performing vocalist direct control over the seven effect options and bypass capabilities
of the Vocal 100.
The following guide will show, in detail, the features and functions of the Vocal 100. Please pay close
attention to the warnings and notes throughout. They have been inserted for the safety of you and your Vocal
100. Within the manual you will also find a step-by-step tutorial.
This manual begins with a quick start section to get you going. Once you’ve had time to explore the layout
of the Vocal 100 panel, carefully read through the entire manual for an in-depth description of each feature.
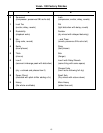
FEATURES:
Hi and Lo Z Inputs
Left and Right XLR Mic Level Outputs
Left and Right 1/4" Line Level Outputs
1/4" Line Level Dry Output
Auxiliary Input and Headphone Output For Rehearsal
Adjustable Analog Compressor (enabled per preset)
24-Bit Digital Stereo Processor
20 Factory Presets
20 User-Definable Presets
Input Clip LED
Full Effects Editing (on user presets)
Foot Control Selection for Presets and Bypass
Selectable Low Cut Filter
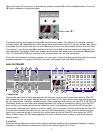
QUICK START
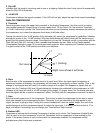
Since the Vocal 100 is an effects processor, you will need to have a functioning PA (mixer, amp, speakers,
etc). Plug the cable end of the wall-mount AC adapter into the Rear Power Jack of the Vocal 100. Connect
the wall-mount AC adapter to the proper supply voltage as indicated on the adapter.
Using a standard mic cable, plug in to both your microphone and the Mic Input of the Vocal 100. If you have
a Hi Z mic, use the Hi Z input instead. Using another standard mic cable, connect to the Left Mic Output of
the Vocal 100 and then to the vocal channel input of your mixer. NOTE: It is recommended to do this
with output level control of the Vocal 100 and your mixer turned down. This is done to avoid any hook-up
transients that may damage your speakers.
Next, while the output levels are turned down, set the input level of the Vocal 100. To do so, adjust the Input
Level control so that your loudest singing peaks barely light the clip LED. Refer to the recommended settings
on page 18 to set the Analog Compressor.
Your Vocal 100 is programmed at the factory with 20 presets that cannot be edited. However, a copy of the
programs exits in an editable location in the Vocal 100’s memory. We will not get into the editing process
here, since that will be discussed in another section. Its much easier to use the Vocal 100’s factory presets to
get an idea of its remarkable capabilities.
ENGLISH
3