


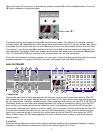

VARIOUS LED FUNCTIONS
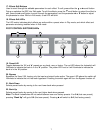
Main LED Display:
The main LED display indicates the preset number when in Play mode and the parameter being modified
when in Edit mode. As previously indicated, the center decimal point in the main LED display indicates
whether the bank is set to the user or factory bank of presets. The right decimal point in the main LED display
will illuminate, indicating that the DSP is about to clip. For the quietest operation, set the preamp volumes so
that this indicator illuminates occasionally (i.e., set the preamp volume controls so the light flickers and use
the Output Level and preset volume control to set the desired volume.) However, for the cleanest operation,
avoid settings where this light stays on constantly. Note: In Mono mode the LED is normally on. It goes off
when clipping occurs.
Effects LED Matrix:
This feature was included to provide an easier way to identify presets. When in Edit mode, the effects LED
matrix on the far right of the preamp is used to indicate which effect and which parameter is being edited.
When in Play mode, the LED matrix indicates which effects are active.
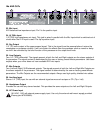
Footswitch LEDs:
The LEDs on the footswitch indicate the selected preset: A or b. If the Bypass LED is off, the setting will be A
or B depending on which is illuminated. To change between A and B, simply press the A/B switch. To switch
to Bypass and override the setting of the A/B switch, press the Bypass override button. When the Bypass
LED is lit, the unit is in Bypass mode regardless of the A/B setting. To return to A or b, press Bypass to return
to the desired setting. This system is ideal for toggling between two presets and/or bypassing the unit
completely.
THE DSP EDGE CONTROL:
The DSP Edge Control globally adjusts the high end of the delay and reverb tails. This can be very useful
when trying to simulate an analog or tape delay. By adjusting this control to lower settings, the resulting
delays will sound warmer, more “analog”. By adjusting this control to higher settings, the resulting delays will
sound brighter, more “digital”.
The digital reverb is also tailored by the setting of the DSP Edge control. For more modern sounding, brighter
reverbs, the control should be set higher. To more closely approximate a spring reverb, set the control lower.
Additional equalization for the delays and reverbs can be obtained by using the programmable EQ, with
the delays and reverbs mixed 100% wet and the master Left and Right mix controls to set the mix. This
technique allows for the creation of many different sounding reverb effects.
PLAY MODE
Selecting Presets/Basic Functions
Whenever the Vocal 100 is powered up, it defaults to Play mode. When in Play mode, the main LED display
indicates the current patch number. On power-up, the selected preset will be 0.A, which is user-modifiable
preset A of bank 0. The presets are arranged in 20 banks (0-9 of user and 0-9 of factory sets) of 2 patches
(A and b) per bank for a total of 40 presets. If the decimal point between the 0 and A illuminates, this
signifies that the preset is in the user set and is editable. If there is no decimal point, the patch is a factory
one. To change from the factory to the user set, simply scroll through the patches using the parameter ▲ or
▼ buttons into the other set (0.A to 9b or 9.b to 0A).
9