


24
En
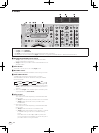
Changing the TRAKTOR 2 Preferences
Change TRAKTOR 2’s environmental settings according to the usage conditions of your hardware.
For details on TRAKTOR 2’s environmental settings, see the TRAKTOR 2 manual.
! If you wish to restore the changes to the environmental settings to their defaults, please check the following website.
http://www.prodjnet.com/support/
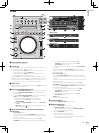
1 Click the TRAKTOR 2 [ (Preferences Button)]
button.
Open the TRAKTOR 2 settings menu.
2 Select the category and make the settings.
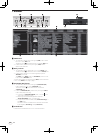
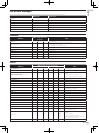
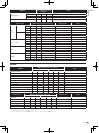
List of TRAKTOR Pioneer DDJ-T1
EDITION 2 setting items
Category Descriptions
Audio Setup
Select the audio devices to be used for audio input/output.
Set the sampling rate and latency.
Output Routing
[Internal]: Use TRAKTOR 2’s internal mixer.
To use only with this unit, select [Internal].
[External]: Use an external mixer.
Set the master audio output and monitor audio output
terminals.
Input Routing
Set the audio input from an external device (portable audio
player, microphone, etc.) to a deck.
Loading
Set the conditions and functions for loading tracks to the
decks.
Transport
Set the tempo and key lock functions.
Decks
Set the track deck’s waveform screen color, etc.
Mixer
Set the auto gain, master limiter, etc.
Global Settings
Set the TRAKTOR 2 on-screen display for the global section,
etc.
Effects
Set the types of effects to be displayed when selecting
effects.
Recording
Set whether to record the TRAKTOR 2 master audio output
or the external audio input. Set the location where recorded
audio files are stored.
Browser Details
Set whether or not to display the preview player, cover art,
etc.
File Management
Make the settings for track importing, auto analysis, the
analysis BPM range, etc.
Set the path to the data (music files, iTunes library files, etc.).
Controller
Manager
Assign TRAKTOR 2 functions to the controller, keyboard, etc.
Traktor Kontrol X1
Set this when using Native Instruments’ Traktor Kontrol X1.
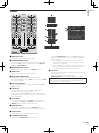
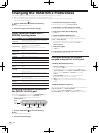
Assigning the desired functions to
the [NEEDLE SEARCH] pad
When assigning the desired functions to the [NEEDLE SEARCH] pad,
first press the [FUNCTION] button to turn [FUNCTION] on.
! Functions can be assigned to up to 5 points on the
[NEEDLE SEARCH] pad.
FUNCTION
NEEDLE SEARCH
Function1 Function5
Function2
Function3
Function4
1 Click the TRAKTOR 2 [ (Preferences Button)]
button.
Open the TRAKTOR 2 settings menu.
2 Click [Controller Manager].
3 Click [Device] under [Device Setup].
From the pull-down menu, select [Pioneer. DDJ-T1].
4 Click [Add In...] under [Assignment Table].
From the pull-down menu, select the function to be assigned.
5 Click [Learn] under [Device Mapping].
Turn [Learn] on.
6 Touch the [NEEDLE SEARCH] pad.
Touch the point at which you want to assign the function.
The name of the point touched is displayed in the field to the right of
[Learn] at [Device Mapping].
! The place at which the function is to be assigned can also
be selected by clicking the field to the right of [Learn] at
[Device Mapping].
7 Click [Learn] again.
Turn [Learn] off.
8 Click [Close] at the bottom right of the screen.
Close the TRAKTOR 2 settings menu.
Setting the details of the functions
assigned to the [NEEDLE SEARCH] pad
Setting the [Mapping Details]
— [Modifier Conditions]: Sets the operating conditions for the func-
tion selected at [Add In...].
The operating conditions are switched with the [Value] setting.
— [Type of Controller]: Selects [Button], [Fader/Knob], [Encoder], etc.
When assigned to [Function 1] – [Function 5], this is set to
[Button].
— [Interaction Mode]: Sets the way in which the functions of
TRAKTOR 2 and the controller are associated.
— [Hold]: The function operates while the button is pressed.
— [Toggle]: The function’s properties switch each time the button is
pressed.
Setting the [Button Options]
Even more detailed settings can be made depending on the settings at
[Type of Controller] and [Interaction Mode].
For example, when [Type of Controller] is set to [Button] and
[Interaction Mode] is set to [Hold], the [Invert] setting can be made.