


DRB1497-B
En
12
12
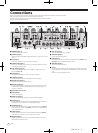
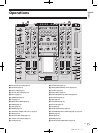
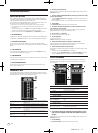
x Crossfader (page 12)
y MASTER (page 12)
z Master Level Indicator (page 12)
A BALANCE (page 13)
B MONO, STEREO (page 13)
C BOOTH MONITOR (page 13)
D START/
STOP (SNAPSHOT) (page 16)
E ON/
OFF (MIDI) (page 16)
F CH EQ (ISOLATOR, EQ) (page 12)
G CH FADER (
, ) (page 13)
H CROSS FADER (
, , ) (page 13)
Basic Operation
Outputting sound
1 Press [POWER].
Turn on the power of this unit.
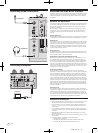
2 Switching the [CD/DIGITAL, PHONO, LINE, USB */*] switch
Select the input sources for the different channels from among the devices con-
nected to this unit.
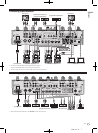
— [CD/DIGITAL]: Selects the DJ player connected to the [CD] terminals. To
select the DJ player connected to the [DIGITAL IN] terminal, set the [CD,
DIGITAL] switch on the rear panel to [DIGITAL].
— [PHONO]: Selects the analog player connected to the [PHONO]
terminals.
— [LINE]: Selects the cassette deck or CD player connected to the [LINE]
terminals.
— [USB */*]: Selects the sound of the computer connected to the [USB]
port.
3 Rotate [TRIM].
Adjusts the level of audio signals input in each channel.
The corresponding channel level indicator lights when audio signals are being
properly input to that channel.
4 Set the channel fader to the inner position.
Adjusts the level of audio signals output in each channel.
5 Switch the [CROSS FADER ASSIGN (A, THRU, B)] switch.
Switches the output destination of each channel.
— [A]: Assigns to [A] (left) of the crossfader.
— [B]: Assigns to [B] (right) of the crossfader.
— [THRU]: Choose this when you do not want to use the crossfader. (The
signals do not pass through the crossfader.)
6 Set the crossfader.
This operation is not necessary when [CROSS FADER ASSIGN (A, THRU, B)] is set
to [THRU].
7 Turn the [MASTER] control.
Audio signals are output from the [MASTER1] and [MASTER2] terminals.
The master level indicator lights.
Adjusting the sound quality
Turn the [EQ/ISO (HI, MID, LOW) ] controls for the individual
channels.
Refer to Specifications on page 28 for the range of sound that can be adjusted by
each control.
Switching the [EQ/ISO (HI, MID, LOW)] function.
Switch the [CH EQ (ISOLATOR, EQ)] switch.
— [ISOLATOR]: The isolator function is set. The indicator lights.
— [EQ]: The equalizer function is set.
Monitoring sound with headphones
1 Connect headphones to the [PHONES] jack.
2 Press [CUE] for the channel to be monitored.
3 Switch the [MONO SPLIT, STEREO] switch.
— [MONO SPLIT]: The sound of the channel for which [CUE] is pressed is
output from the headphones output’s left channel, while the sound of
[MASTER] is output from the right channel.
— [STEREO]: The sound of the channel for which [CUE] is pressed is output
in stereo from the headphones.
4 Turn the [MIXING] control.
This adjusts the balance of the monitor volume between the sound of the channel
for which [CUE] is pressed and the [MASTER] channel sound.
5 Turn the [LEVEL] control for [HEADPHONES].
Sound is output from the headphones in the channel selected by [CUE].
! Monitoring is canceled when [CUE] is pressed again.
! When [LIVE SAMPLER] is turned on, [CUE] button for the TOUCH PANEL
EFFECT and [CUE] button for the [LINK] cannot be pressed simultaneously.