


DRB1497-B
En
15
English
1514
2 Press the [2] button in the [CH] section.
This selects the channel to which the effect is applied.
3 Press [EFFECT] and select [SAMPLER].
This selects the type of effect.
Effect Name Descriptions
OSCILLATOR1 – 4
Sound is created inside this unit, mixed to the sound of the channel
selected in the [CH] section, then output according to the [TRIGGER CH
(SAMPLING/
TRIGGER CH)] trigger.
SAMPLER
The sound of the channel selected at [TRIGGER CH (SAMPLING/
TRIG-
GER CH)] is sampled, mixed to the sound of the channel selected in the
[CH] section, then output according to the [TRIGGER CH (SAMPLING/
TRIGGER CH)] trigger.
PITCH
The pitch of the sound of the channel selected in the [CH] section is
changed, mixed with the channel selected in the [CH] section, then out-
put according to the [TRIGGER CH (SAMPLING/
TRIGGER CH)] trigger.
GATE
The sound input at [CH] is output according to the [TRIGGER CH (SAM-
PLING/
TRIGGER CH)] trigger.
! It is not possible to select multiple effects simultaneously.
4 Press [TRIGGER (SAMPLING/
TRIGGER)].
The [TRIGGER] menu appears.
5 At [TRIGGER CH (SAMPLING/
TRIGGER CH)], select [CH3].
This selects the channel to be used as the effect trigger.
! When [SAME] is pressed, the same channel as the one selected in the [CH]
section is selected as the trigger.
6 At [TRIGGER BAND], press [MID] and [HI].
This selects the frequency band set as the effect trigger.
Only [LOW] (the bass sound) is selected.
7 Press [ON/
OFF].
This turns the effect on.
[ON/
OFF] flashes when the effect is turned on.
8 Touch the control area.
[ ] appears at the point at which the panel was touched.
The [CH3] sound at the point in the control area that was touched is sampled.
Triggered by the low frequency sound of [CH3], the sampled sound is mixed with
the sound of [CH2] (which is continuing to play normally) and output from the
[MASTER] terminals.
The effect changes when the position touched in the control area is changed.
! The effect turns off when [ON/
OFF] is pressed again.
! The sampled sound is only valid while the control area is being touched.
! To switch from the [SIDECHAIN REMIX] to the [FREQUENCY MIX] mode, first
press the [ON/
OFF] button to turn the effect off, then press [MIX].
Using [HOLD]
When [HOLD] is turned on, effect’s parameter information is held even if the effect is
turned off. The parameter information is cleared when [HOLD] is turned off.
! The parameter information and sampled sound are cleared when the effect is
switched.
LIVE SAMPLER
The sound input to the [MIC] terminal or the sound output from the [MASTER]
terminals can be sampled and played on a PRO DJ LINK–compatible Pioneer DJ
player.
Connect this unit and PRO DJ LINK-compatible Pioneer DJ player in advance.
For instructions on connections, see Connecting input terminals on page 7.
1
2
3
7
8
9
4
5
6
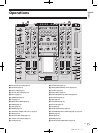
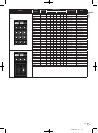
1
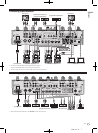
SOURCE SELECT
Select the source to be sampled here.
2
REC VOLUME
Use these to adjust the volume for recording.
The volume can be adjusted in the range –9 dB to +9 dB.
3
Status indicator
This indicates this unit’s status and whether or not sam-
pling data is available.
4
Waveform display This displays the sound as a waveform.
5
Playing address display
This displays the sound as a bar graph.
This is only displayed when previewing the sound.
6
Slider
The sound is played from the position at which the touch
panel was touched.
This is only displayed when previewing the sound.
7
PRE-REC SAVE
The sound is sampled from a point 8 seconds before the
button was pressed.
8
REC (REC STOP)
The sound is sampled for up to 8 seconds from the point at
which the button is pressed.
9
PREVIEW (STOP)
Use this to preview the sampled sound over the head-
phones.
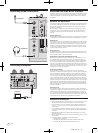
Sampling the sound being played
1 Press [LIVE SAMPLER].
The [LIVE SAMPLER] screen appears on the touch panel.
2 Press [MIC] or [MASTER] in the [SOURCE SELECT].
This selects the channel to be sampled.
3 Press [REC (REC STOP)].
The sound of the channel selected at step 2 is sampled from the point at which
[REC (REC STOP)] was pressed.
! Sampling is possible for up to 8 seconds.
! Sampling stops automatically once 8 seconds have elapsed after [REC
(REC STOP)] was pressed.
4 Press [REC (REC STOP)].
Sampling stops. The sample saving screen is displayed.
Sampling the sound from the point 8 seconds before
1 Press [LIVE SAMPLER].
The [LIVE SAMPLER] screen appears on the touch panel.
2 Press [MIC] or [MASTER] in the [SOURCE SELECT].
This selects the channel to be sampled.
3 Press [PRE-REC SAVE].
The sound for the channel selected in step 2 is sampled from the point 8 seconds
before [PRE-REC SAVE] was pressed.
! Sampling is possible for up to 8 seconds.
Previewing the sampled sound
1 Press the [CUE] button to the left of the touch panel.
2 Press [PREVIEW (STOP)].
The position being played is displayed at the playing address and slider displays.
! When the touch panel’s slider is touched, the sampled sound is played from
that position.
Playing the sampled sound on the DJ player
Use PRO DJ LINK to access this unit from the DJ player.
The sampled sound (audio file) can be loaded and played on the DJ player.
INST FX
This effect changes in association with the [FILTER] controls for the individual
channels.
1 Press one of the [INST FX] buttons.
This selects the type of effect.
The button that was pressed flashes.
! The same effect is set for [CH1] to [CH4].
2 Turn the [FILTER] control.
The effect is applied to the channel(s) for which the control(s) was (were)
pressed.
Effect Name Descriptions
FILTER (parameter 1)
PARAMETER
(parameter 2)
NOISE
White noise generated
inside this unit is mixed
in to the sound of the
channel via the filter
and output.
Sets the cut-off
frequency for the
filter through which the
white noise passes.
Sets the volume of the
white noise.
ZIP
Lowers the pitch of the
channel’s sound for
output.
Sets the amount of
pitch shifting for lower-
ing the pitch.
Sets the balance
between the original
sound and the effect
sound.
CRUSH
Changes the channel’s
sound to a crushed
sound for output.
Sets the degree by
which the input sound
is crushed.
The further the control
is turned clockwise,
the more the effect is
stressed.
JET
Adds a flanger effect for
output.
Sets the flanger effect.
The further the control
is turned clockwise,
the more the effect is
stressed.