


Using Auto Accompaniment
11
The lowest note you play determines the
key of the chord. For example, if the lowest
note is C, the keyboard plays a C chord.
±
1. Set
MODE
to
CONCERT CHORD
.
2. Enter a two-digit auto-rhythm number.
3. To start the auto-rhythm before the auto
accompaniment, press
START/STOP
or
I
NTRO/ENDING 1
or
2
.
Or, to synchronize the start of the
selected auto-rhythm with your
accompaniment, press
SYNCHRO/FILL-
IN NEXT
.
4. Begin the accompaniment at the
desired interval by pressing the desired
accompaniment key(s).
To play a melody along with the
accompaniment, press any key(s) to
the right of the accompaniment keys.
5. Adjust the tempo and
VOLUME
to the
desired levels.
6. To change chords without interrupting
the rhythm, simply press the auto
accompaniment key(s) required to form
the new chord.
7. To stop auto accompaniment and the
auto-rhythm, press
START/STOP
.
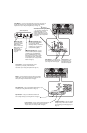
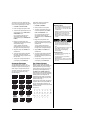
56#0&(+0)'4+0)
The standard fingering method uses
standard formations of three or four notes,
and lets the experienced musician play a
wider variety of accompaniment chords.
±
This chart shows the 15 chord types you
can play on your keyboard by using
standard fingering.
Follow these steps to start standard
fingering auto accompaniment.
1. Set
MODE
to
FINGERED
.
2. Select and enter an auto-rhythm.
3. To start the auto-rhythm before your
auto accompaniment, press
START/
STOP
or
INTRO/ENDING 1
or
2
.
Or, to synchronize the start of the
selected auto-rhythm with your
accompaniment, press
SYNCHRO/FILL-
IN NEXT
.
4. Begin the accompaniment at the
desired interval by pressing at least
three accompaniment keys to play the
desired chord.
To play a melody along with the
accompaniment, press any key(s) to
the right of the accompaniment keys.
5. Adjust
TEMPO
and
VOLUME
to the
desired levels.
6. To change chords without interrupting
the rhythm, simply press the auto
accompaniment keys required to form
the new chord.
7. To stop auto accompaniment and the
auto-rhythm, press
START/STOP
.
(7..4#0)'%*14&5
While the concert chord and standard
fingering methods limit chord formations to
the accompaniment keys, the full-range
chord method lets you play chords of any
type using any of the keyboard’s keys.
Set
MODE
to
FULL RANGE CHORD
and
follow the steps under “Standard Fingering”.
If you press three or more keys that form a
chord anywhere on the keyboard, the
keyboard plays that chord. The keyboard
responds with melody sounds if you press
fewer than three keys.
±
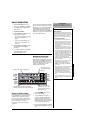
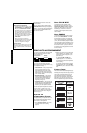
In the full-range chord mode, the keyboard
recognizes 23 more chords (in addition to
the 15 in the fingered chord mode). The
following is an example of those chords with
C as the base note.
C
6
Cm
6
C
69
.
C
DEFG A
J
B
J
_
C
_
C
_
C
_
C
_
C
_
C
_
C
BC
mDmFm Gm Am B
J
m
_
C
_
C
_
C
_
C
_
C
_
C
_
C
Dm
7
J
5
A
J
7
F
7
Fm
7
Gm
7
A
J
add9
_
C
_
C
_
C
_
C
_
C
_
C
±
016'
±
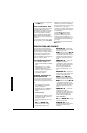
Standard Fingering
• You do not have to press the key marked
with parentheses on the keyboard in the
chart to produce a 7, m7, M7, mM7, add9,
or madd9 chord.
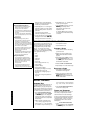
• Although the chart shows only one possible
fingering position for each chord, it is
possible to play a chord using several
different positions. For example, the
following three positions produce the same
C chord.
• When you play an aug, 7
J
5
, or dim7 chord,
the lowest note you play determines the
root of the chord. Be sure that your
fingering correctly defines the root you
want.
• See “Fingered Chord Chart” on Page 31 for
all the chords you can play on your
keyboard using standard fingering
accompaniment.
Full-Range Chords
• You cannot use inverted fingerings. The
lowest note is the root.
• You can play the same chord without
pressing the 5th G.
• When the notes of a chord are more than 5
notes apart, the lowest sound becomes the
base note.