


Connecting HeadphonesConnecting Headphones
3
%100'%6+0)*'#&2*10'5
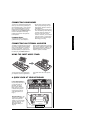
To listen to your keyboard without disturbing
others, you can connect an optional pair of
stereo headphones with a
1
/
4
-inch (6.35 mm)
plug. Your local RadioShack store sells a
wide selection of headphones. Insert the
headphones’ plug into
PHONES/OUTPUT
on
the back of the keyboard. Connecting
headphones disconnects the keyboard’s
built-in speakers.
.+56'0+0)5#('.;
To protect your hearing, follow these
guidelines when you use headphones.
• Set the volume to the lowest setting
before you begin listening. After you
begin listening, adjust the volume to a
comfortable level.
• Do not listen at extremely high volume
levels. Extended high-volume listening
can lead to permanent hearing loss.
• Once you set the volume, do not
increase it. Over time, your ears adapt
to the volume level, so a volume level
that does not cause discomfort might
still damage your hearing.
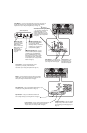
%100'%6+0)#0':6'40#.#/2.+(+'4
To amplify your keyboard’s sound, you can
connect it to an optional external amplifier
using an audio cable with a
1
/
4
-inch (6.35
mm) plug (not supplied). To connect an
external amplifier to your keyboard, insert
the cable’s plug into
PHONES/OUTPUT
on
the back of the keyboard, then connect the
other end of the cable to the amplifier’s input
jack(s) (such as AUX IN or TAPE IN). Your
local RadioShack store sells a full line of
amplifiers, speakers, and cables.
75+0)6*'5*''6/75+%56#0&
To easily view sheet music while playing
your keyboard, insert the supplied sheet
music stand into the slot on the top back
panel.
#37+%-.11-#6;174-';$1#4&
Preset 4-Band Equalizers
—
lets you easily set the tone to
your favorite sound mix
(Standard, Jazz, Rock,
Dance, Classic, Mellow,
Bright, and so on). You can
even tailor the response of
each frequency band (see
“Using the Equalizers” on
Page 7).
Registration Memory
— lets
you store up to 32 different
setups of the keyboard’s
controls, so you can instantly
recall them when you need
them (see “Using the
Registration Memory” on
Page 14).