


13
Getting Familiar
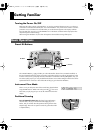
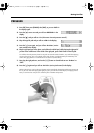
The D Beam functions not only for triggering sounds, but for controlling them as well.
During this explanation, make sure the [EFFECT] button is NOT lit. (OFF)
1.
As an example, push the [DRUMS] button.
2.
Make sure the [D BEAM] button is lit, and pass your hand over the D Beam.
In this case the D Beam is just triggering the sound assigned there.
3.
Next, push the [EDIT] button, and press the [ ] cursor once.
You see <PRESSURE> in the screen.
4.
Push the [ ], and in the display you see <Tx> (transmit) and
<OFF>. Use the [+] button to turn it “ON.”
5.
Now push the [ ] twice and you will see <Rx Pitch> in the
display.
Here you can adjust the pitch bending range you will control with the D Beam.
Use the [+]/[-] buttons or the Control knob, and set it to -1200.
When using the [+]/[-] buttons for data entry, by holding down [SHIFT] and then pressing either of the
buttons, the increments/decrements move much quicker.
Or just turn the Control knob quickly to the left, to get to the -1200 position.
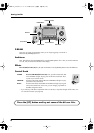
6.
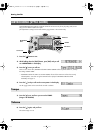
Now pass your hand over the D Beam quickly and at close
range, and you will hear the sound bend.
7.
Then move your hand over the D Beam, and once the sound is
heard, move your hand up and down, to hear how you are
controlling the sound.
8.
Try this:
While you can still see <Rx Pitch> -1200 in the display, tap once the
large pad on the left and set this also to -1200. Now, while tapping the
pad with your left hand, place your right hand above the D Beam, and
then slowly lower your hand. Here you can see how the D Beam can
control the pitch of sounds assigned to other pads.
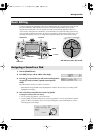
* Remember, the D Beam is sensitive to the light in the space where
you are playing it. See p. 25 for adjustments to the D Beam.
*Actual infrared beam is invisible.
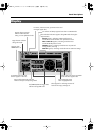
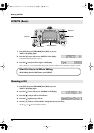
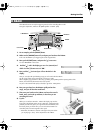
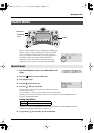
D BEAM
EDIT Button
CURSOR
D BEAM Button
DRUMS Button
Control Knob
EFFECT Button
HPD-10_e1.book 13 ページ 2006年4月7日 金曜日 午後2時14分