


7. Securely tighten the two side board screws and four pedal
board screws.
* When attaching the front board, before tightening the screws, adjust things as
necessary at all the points where there are screws so as to assure that the front
board is aligned in parallel with the pedal board.
8. Set the speaker box so that the speaker cable is above it, and
align the holes in the metal parts on the inner side of the
side boards with the holes in the speaker box.
9. Attach the speaker box to the metal parts on the inside of
the side boards from underneath using screws
B
(M5 x 20
mm). Then fasten the rear with screws
B
(M5 x 20 mm) as
well.
Rear view
Screws
B
x 4
2. Install the Piano onto the Stand
1. Align the two screws at the bottom of the piano (one each
at left and right) with the metal xtures on the side boards,
then while slightly lifting the front end of the piano, push
it toward the rear, while making sure that the screws have
been properly grasped by the metal xtures.
* When handling the piano, rmly grasp it. Be careful, so you do not get your
ngers pinched.
2. Fasten the piano to the stand with the screw
B
(M5×20 mm).
Screw
B
x 2
Screw
B
Please don’t get your
ngers pinched.
3. Connect the speaker cable to the speaker connector on the
bottom of the main unit, connect the AC cord to the AC In
connector on the bottom of the main unit, and connect the
pedal cord to the Pedal jack.
Speaker cable
Power
cord
Pedal
cord
4. Loosen the two thumbscrews
C
that are attached at the
locations shown in the gure. As illustrated, you should
create gaps that are about 10 mm in size.
Rear view
Space
10 mm
5. Attach the rear board by hooking it onto the gaps left by the
screws, as shown in the gure.
Holder
Thumbscrew
C
6. Use two of the thumbscrews
C
to fasten the rear board.
Thumbscrew
C
x 2
7. Securely tighten the thumbscrews
C
that were loosened
in step 4, as well as the thumbscrews
C
that were used to
fasten the rear board in step 6.
* The screws can be more securely tightened if you raise the rear board
slightly.
8. Fasten the headphone hook using screws
D
(M4 x 16 mm).
Screw
D
x 2
3. Adjusting the Adjuster
Turn the adjuster to lower it until the adjuster is in rm contact with
the oor. In particular, when you’ve placed the piano on carpet, you
must turn the adjuster until it is pressing rmly against the oor.
Adjuster
* The pedal may be damaged if there is a gap between the adjuster and the oor.
Parts Check
Assembling the LX-15
* To assure that assembly is carried out properly, make sure to read these instructions before you begin the assembly. Please keep these instructions close at hand, so you can refer to
them whenever you need.
* To move the piano, lift it carefully—all the while keeping it level.
* Be very careful, when you assemble and move the piano, to make sure that you do not drop it on your hands or feet.
* Make sure to enlist the help of at least one other person when assembling this unit and moving it to a di erent location.
* Make sure to keep screws and any other small parts in a safe location that is out of the reach of small children, so such small parts won’t accidentally get swallowed.
* The screwdriver needed to perform the assembly is not supplied. You’ll need to have ready a Phillips screwdriver that matches the size of the screws.
* All screws should be tightened provisionally rst, then tightened later. To tighten a screw provisionally, screw it in until about half of its length is no longer visible. Do not use an
electric screwdriver when tightly securing the screws. Otherwise, you risk stripping the threads.
* After rmly tightening all the screws, place the unit at a location that is level and sure to remain stable. The unit must never be placed on top of deep-pile carpet. Otherwise, you risk
causing damage to the pedals due to instability and unnecessary movement.
* The piano unit and the surface of the stand are very delicate; handle with care to avoid scratching them.
* Do not place the piano unit directly on the oor. Doing so will damage the bottom panel case and the connectors and holders on the bottom of the piano.
Copyright© 2011 ROLAND CORPORATION
All rights reserved. No part of this publication may be reproduced in any form without the written permission of ROLAND CORPORATION.
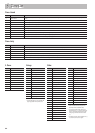
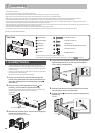
1
Side Board (left)
2
Side Board (right)
3
Pedal Board
4
Front Board
5
Speaker Box
6
Rear Board
When Moving the Piano
When you need to move the unit, you should rst close the keyboard cover, close
the lid, detach the AC cord, and raise the adjusters of the stand. When moving
the unit, at least two people should work together and lift the unit carefully, all
the while keeping it level, and being very careful so as not to drop the unit on
anyone’s feet.
1. Assembly Procedure
* At rst, assemble the entire stand in a temporary fashion, without really
tightening the screws. Then, after checking the overall alignment of the boards
(and gently shifting certain parts where necessary), go around and tightly fasten
each of the screws.
* If necessary, spread out a blanket or similar material to prevent the stand or oor
from being scratched during assembly.
* Be careful not to pinch the pedal cord during assembly.
1. As shown in the illustration, place the left and right side
boards on the pedal board so that the metal brackets are on
the inside, and fasten them provisionally using screws
A
(M6 x 40 mm).
2. After you have provisionally tightened screws
A
(four
locations), use a screwdriver to tighten them rmly.
* When attaching the pedal board, do not allow any gap to remain between the
side board and pedal board when the pieces are assembled.
Screw
A
x 2
Leave the pedal cord extended.
Screw
A
x 2
As seen from
the bottom
3. With the help of another person, raise the left and right side
boards to an upright position.
* Take care that the pedal boards are not twisted.
4. Loosen the screws attached to the left and right side boards
approximately three turns, so that they protrude about 3
mm, as shown in the illustration.
Space
3 mm
5. Hook the metal brackets of the front board over the screws
you loosened, as shown in the illustration.
6. Use four screws
B
(M5 x 20 mm) to provisionally fasten the
pedal board.
Rear view
B
Screws you loosened in step 4
(two screws)
Screws
B
x 4
A
2
3
1
b
a
c
Screw (M6 × 40 mm) x 4
B
2
3
1
b
a
c
Screw (M5 × 20 mm) x 10
C
2
3
1
b
a
c
Thumbscrew x 4
(two of them are already attached to the unit)
D
2
3
1
b
a
c
Screw (M4 × 16 mm) x 2
E
2
3
1
b
a
c
Headphone Hook x 1
* 5 1 0 0 0 2 1 6 0 2 - 0 1 *
* When handling the side boards, avoid touching the metal portions marked with in the gure.
2
3
1
b
a
c
1
2
3
4
5
6
* You will also need to have Phillips screwdrivers (size: #2, #3).
59
Operation Guide Panel Descriptions Before You Play Performing Practicing Piano Designer
Convenient Functions
Appendix
Function Mode