


Subject
• Others
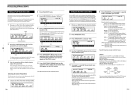
3. Inspection
of
each function
(No.2)
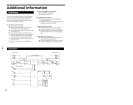
• LCD
#1
• LCD #2
• LED
4.
Completion
of
the inspection
Operation and Display
5)
Other
checks
• Other error messages are displayed in *
1.
[DRAM1 ERR]
or
[DRAM2 ERR]
Automatic inspection
of
the soldered bridge, etc.,
of
IC601, IC602, IC603 is carried out.
If
this display appears, apply a soldering iron to the terminal
of
each IC and check the
application
of
the solder.
In case
of
[DRAM1 ERR], check IC601 and IC602, and in case
of
[DRAM2 ERR], check
IC603 and IC604.
[MIDI PORT ERROR]
By using a DIN cable to connect the MIDI IN/OUT terminals on the rear panel, the automatic
inspection
of
the MIDI terminals is carried out.
When
there is no special requirement to make a connection, this display will appear but it may
be ignored .
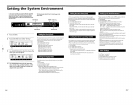
•
If
the brackets [ ] were fully filled with asterisks" * " in the preceding checks
of
the switch and
Jog
& Shuttle, press the [ENTER] key. The following display will appear and test mode
No.2
will
be activated.
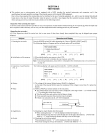
r----------------------------.
I TEST
MODE
2 I
I I
I I
:
[LCD]
[LED]
:
[EDIT]
[A
]
[
B]
[C] [D]
[
E]
[F]
[EXIT]
1) When pressing the [A] key, check that all LCD dots become black.
2) When all the LCD dots have become black, check that the contrast changes when you rotate the
Jog
& Shuttle dials.
3) When pressing the [B] key, check that each dot and segment light up between the 8 segments,
meters and LEDs.
When pressing the [EXIT] key, reactivating is carried out and the test mode
is
completed.
< Examples when initialization has to be carried out>
1.
When reconnecting the power supply and the keys do not have any effect, and when the there are distortions in the display due to
unstable operation
of
the software.
2.
When the version
of
the ROM (IC607) has been changed. (Including change
of
circuit board.)
3. When the power supply has been changed
or
removed once.
* Even except for the above, when there are no special instructions from the customer, carry out the initialization operation.
The following notes are included in the
"Instruction Manual". (See step 3.)
[Notes on being requested to
carry
out
repair]
When requesting a repair, data in the USER memory may be reverted to the original factory data settings.
Be sure to save any important data in an external MIDI data filer,
or
make written notes
of
the parameter settings.
* Method
of
initializing without entering the test mode
•
Tum
the POWER switch
ON
while simultaneously keeping the [SAVE] and [ENTER] keys depressed .
• After the title screen has been shown and "Initialized!" is displayed, the initialization
is
completed.
*
In
this case, the data
of
the internal clock is not initialized.
*
The
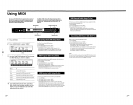
following shows the initialization method and the content that is actually initialized.
Initialization
with
the test mode
~d
[SAVE]
+ [ENTER]
Memory initialization
(YES) Memory initialization
(NO)
Content being initialized
Initialization
of
the internal system
0 0
0
Initialization
of
the user memory
0
0
x
Initialization
of
the clock data *
x
0
0
* As to setting
of
the clock, please refer to page 24 in the Instruction Manual.
-
18-