15
3. WR-DA7 system applications
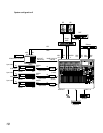
3.1 Example of systems for ADAT (1 unit)
(When a timecode is recorded on a tape track)
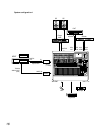
This system is used to record the SMPTE timecode on track # 8 of an ADAT. This timecode will be
used as the timecode reference for automation.
Method of connection
With the mixer powered ‘OFF’ Insert the option card WR-ADAT (Slot 1) and WR-SMPTE in the dedi-
cated slot of the WR-DA7 and firmly fasten them to the mixer using the supplied screws.
Connect the WR-ADAT card of the WR-DA7 to the DIGITAL IN/OUT terminal of the ADAT using an
optical cable and press the DIGITAL IN switch on the front panel of the ADAT to select the digital
input mode.
The timecode is transferred by using the 8th Channel’s OUTPUT (RCA Pin Jack) of the ADAT
analogs output to the SMPTE IN (XLR: 1,3-GND, 2-SIGNAL) of the WR-DA7 using the (optional)
WR-SMPT installed.
WR-DA7 setting
Set the ADAT to the wordclock master and the WR-DA7 to the slave.
In the INPUT SET screen of D-I/O of the WR-DA7, set the SOURCE SELECT to ‘SLOT1.’
To display the SMPTE timecode received at the SMPTE IN, set the TIME BASE to ‘SMPTE’ in the
EXECUTE screen of the AUTOMATION window.
ADAT setting
To use the ADAT as the wordclock master, press the CLOCK SELECT switch to select ‘INT 48k’ or
‘INT 44.1k’ (for the ADAT-XT).
For ADAT’s other than the ADAT-XT select to INT 48kHz, select the Fixed Mode. For INT 44.1kHz
setting, select the Variable Mode. Then, press the PITCH DOWN switch to select the setting at -
147cent (display of 44.1).
During ADAT playback, there is no PLAY output while ALL INPUT on the front panel is ON. ALL
INPUT must be turned OFF.


