57
3.16 Tandem-Connection to MAX (Macintosh) expansion software
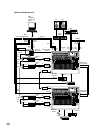
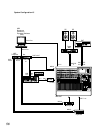
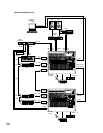
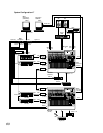
The example refers to a recording or mixing automation system using two WR-DA7s and PC expan-
sion software. By using the expansion software, the faders, EQ, PAN, and channel ON/OFF of the
two WR-DA7s can be separately controlled in synchronization with the MIDI timecode. The setup
data of the two WR-DA7s can be stored and later recalled from the expansion software.
Connecting Procedures
You will need two serial cross cables (ImageWriter II printer cables) ready, and connect the printer
port of the Macintosh computer (for the expansion software) to the [To PC] port of the master and
the modem port of the computer to the [To PC] port of the slave.
With the WR-DA7 powered "OFF" Insert the WR-TNDM card into slot 3 of each of the two WR-DA7s,
and fasten the cards securely with the supplied screws.
Set the switch on the back of the WR-TNDM card in the master WR-DA7 of the tandem system to
[Master] and select slave on the WR-DA7 to act as the [Slave].
Connect the WR-TNDM cards in the two WR-DA7s to each other using the proprietary Tandem
cable (Part # DA/DB available in the U.S.A.).
Connect the MIDI port of the master WR-DA7 to Port 1 of MIDI Timepiece A/V and the MIDI port
of the slave WR-DA7 to Port 2 of MIDI Timepiece A/V using standard MIDI cables for communica-
tion between the two WR-DA7s.
For connection of the two WR-DA7s to the DA-98 and DA-38s refer to the example of the system
that uses the TASCAM MDM's.
For word clock connection, connect WCK OUT of the master WR-DA7 to WCK IN of the slave WR-
DA7 using a 75-ohm BNC-BNC cable. Set the termination of the master and slave WR-DA7s to 75
ohms (=ON), respectively.
To make the DA-98 serve as timecode master, connect the MIDI OUT of the DA-98 to Port 3 IN of
the MIDI Timepiece A/V using a MIDI cable.
To supply MMC from the master to the DA-98, connect the MIDI IN of the DA-98 to Port 3 of MIDI
Timepiece A/V using a MIDI cable.
To sync the operation of the three DA-38s with the DA-98, connect the Sync Out of the DA-98 to
the Sync In of the first DA-38 using a TASCAM sync cable (PW-88S or L). Similarly, connect the sec-
ond and third DA-38s.
WR-DA7 Setup
This system uses the DA-98 as the wordclock master. The WR-DA7 is synchronized with the DA-98
that is connected to Slot 1. Therefore, set [Source Select] to [Slot 1] on the D-I/O input set
screen.
This system uses the DA-98 as the timecode master. Set the MTC receive ports of the two WR-DA7s
to MIDI. Set [Thru] in the [Others] item to [ON] because MTC through the expansion software is
necessary for the master.
This system performs MMC control on the DA-98 from the master, set the MMC Port of the master
to MIDI and [Thru] in the item [Others] to [ON] and match [MIDI CH] with the MIDI/bus ID of
the DA-98.


