34
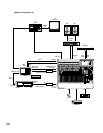
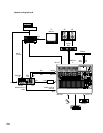
3.8 Example of systems for VTR (1 unit), ADAT (1 unit), and BRC
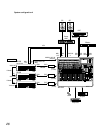
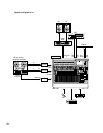
This is a post-production system consisting of the ADAT and the BRC, in addition to the WR-DA7
and a video recorder. The SMPTE timecode output is generated from the video recorder, this out-
put goes to the BRC. The BRC supplies the timecode and the wordclock to the ADAT and the WR-
DA7. Editing and Automation becomes possible in synchronization with the timecode from the
video recorder.
Method of connection
Insert the option card WR-ADAT in Slot 1 of the WR-DA7 and firmly fasten it to the Da7 with the
supplied screws.
Connect the WR-ADAT card from the WR-DA7 to the DIGITAL IN/OUT of the ADAT using an optical
cable and press the DIGITAL IN switch on the ADAT’s front panel to select the digital input mode.
Route the SMPTE timecode from the video recorder to the SMPTE IN (Phone Jack) of the BRC so
that the BRC is synchronized with the timecode of the video recorder.
To use the BRC as the clockmaster, connect WORD OUT (48kHz) of the BRC to WORD CLOCK IN
of the WR-DA7 using a BNC-BNC cable and set the WR-DA7 termination at 75 Ohm=ON.
Use MIDI cables to connect the WR-DA7 to MIDI IN/OUT of the BRC. This makes MMC and MTC
functions possible.
For the timecode, MTC is received from the MIDI connections. It is possible to receive SMPTE
timecode using the WR-SMPT option card (XLR: 1,3-GND, 2-SIGNAL) in the WR-DA7.)
WR-DA7 setting
To use the WR-DA7 as a slave unit, set SOURCE SELECT to ‘WCK IN’ in the INPUT SET screen of
the D-I/O. (For synchronization with the ADAT card source, set SOURCE SELECT to ‘SLOT1.’)
For MMC, set MMC PORT to ‘MIDI’ in the MIDI SETUP screen. The MIDI channel of MMC should
be set to the same MMC channel being received on the BRC.
To receive MTC on the DA7, set MTC PORT to ‘MIDI’ in the MIDI SETUP screen.
To view MTC on the DA7’s LCD screen, set TIME BASE to ‘MTC’ in the EXECUTE screen of
AUTOMATION. (To use the SMPTE timecode, set TIME BASE to ‘SMPTE.’)
ADAT setting
For ADAT wordclock setting, connect a Sync cable from the BRC and turn on the power supply. At
this time, setting is automatically made to ‘EXT’ and the ADAT works as a slave machine for the
BRC.
Regarding the power supply for the ADAT and the BRC; the power supply for the ADAT should be
turned on first, then, the power supply for the ADAT should be turned on next.
The audio input of the ADAT is used in the digital input mode. Therefore, the DIGITAL IN switch
should be selected.
During ADAT playback, there is no output if ALL INPUT is ON. ALL INPUT must be turned OFF.


