


RECORDING
Introduction to DAT recording
Unlike ordinary audio cassette tapes, various control codes
called subcodes can be written on the DAT cassette tape
separately from the audio signal. The subcodes are written
for a variety of convenient playback and tape editing
functions. You can write three types of subcodes; start ID,
end ID and skip ID.
Start ID: Indicates the beginning of each tune and is used
for programming and searching for tunes.
End ID: Indicates the end of the recording.
Skip ID: Indicates the beginning of a section to be
skipped.
In addition, absolute time is automatically written after the
recording is completed.
Before making an important recording, it is
recommended that you make a trial recording to ensure
that the desired audio is being recorded properly.
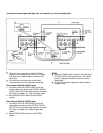
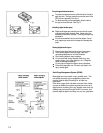
Recording from the digital input jacks (coaxial or optical jack)
This procedure is recommended when recording from another DAT deck
or other digital audio source.
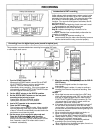
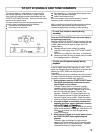
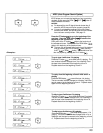
1 Turn the POWER switch ON.
Whenever the POWER switch is turned ON, the START
ID AUTO WRITE button is set to on and the button
lights up. The tune numbers will be written
automatically during recording. If the tune numbers are
not necessary, press the START ID AUTO WRITE button
so that the light of the button goes off.
2 Set the INPUT selector to the DIGITAL position.
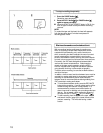
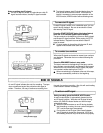
3 Set the DIGITAL INPUT selector on the rear panel
according to the jacks to be used.
Coaxial jacks: Set to the COAXIAL position.
Optical jacks: Set to the OPTICAL position.
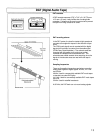
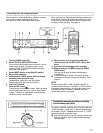
4 Load a DAT cassette in the cassette holder.
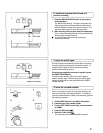
5 Press the REC button
The unit enters record stand-by mode. When recording
from the beginning of the tape, a sound muted section
of about 7 seconds is automatically recorded before the
deck enters record stand-by mode.
6 Set the source to be recorded to play mode and
Dress the PLAY button to start recording.
When the START ID AUTO WRITE button is set to on
and the unit encounters a sound muted section of more
than 2 seconds, a start ID is written and the tune is
numbered automatically.
7 When the recording is completed, press the END ID
WRITE button.
After the end ID signal is written, the tape stops
automatically.
NOTES:
If the end ID signal is written, it is easy to continue a
recording from the end of a previous recording. See
page 20.
When digital sources are recorded from a DAT deck
which can send category code "DAT and the start ID
and skip ID signals to digital outputs, make sure the
START ID AUTO WRITE button is turned on (lit). The
unit records start ID and skip ID signals, which are
contained in the source, as they are.
If the power of the source to be recorded is turned off,
the unit enters record stand-by mode and the tape
running stops. In this state, turning on the power of the
source to be recorded resumes recording starting from
the next tune number.
When recording through the digital input jacks, no
signal is output to the digital output jacks.
Be sure to set the INPUT selector and DIGITAL INPUT
selector before recording. If they are switched during
recording, the unit enters pause mode.
The sampling frequency is automatically switched
according to the source being recorded.
When recording from the digital input jacks, there is no
need to adjust the recording level.
16