


CAUTION: READ THIS BEFORE OPERATING
YOUR UNIT.
1. This unit is a sophisticated digital audio tape recorder. To
ensure proper operation for the best possible performance,
please read this manual carefully.
2. Before using this unit for the first time, wait 1 to 2 hours after
plugging the AC power cord into the wall outlet.
3. Choose the installation location of your unit carefully. Avoid
placing it in direct sunlight or close to a source of heat. Also
avoid locations subject to vibration and excessive dust, heat,
cold or moisture. Keep it away from sources of hum such as
transformers or motors. If interference in TV or radio
reception occurs during operation, increase the distance
between the two components.
4. Do not open the cabinet as this may result in damage to the
deck or electrical shock. If a foreign object should drop into
the deck, contact your local dealer.
5. When removing the power plug from the wall outlet, always
pull directly on the plug; never pull the cord itself.
6. Do not apply excessive force when operating switches and
knobs.
7. When moving the deck. be sure to first pull out the power
plug and remove all cords connecting the deck to other
equipment.
8. Do not attempt to clean this unit with chemical solvents as
this may damage the finish. Use a clean, dry cloth.
9. If the unit does not work properly while in use, after turning
the POWER switch OFF, disconnect the AC power cord plug
from the AC outlet and wait for about 30 seconds. After that,
connect it again to operate.
10. Be sure to read the "Troubleshooting" section of this manual
for advice on common operating errors before concluding
that your unit is faulty.
11. Keep this manual in a safe place for future reference.
Cleaning the head
When the head is slightly dirty, noise is heard or dropouts occur
during playback. If the head becomes excessively dirty, a signal
read error occurs during playback, and the sound cannot be
heard. At this time, the "WARNING" indicator appears. If this
occurs, use a commercially available digital audio cleaning tape
or have your Yamaha dealer clean the head. After prolonged
use, the head may require replacement due to wear. Consult
your Yamaha dealer.
On drum life
It is recommended to replace the head drum with a new one
within about 1,500 hours of use.
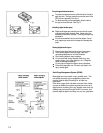
Dew condensation
Dew is the moisture that collects on a cold object in a warm room.
Dew can form on the drum and head inside the tape deck
causing damage to tapes and head. This unit contains a dew
prevention heater. Once the unit is connected to an AC outlet,
the heater turns on to prevent dew from forming. It takes from 1
to 2 hours to remove dew. When dew is detected on the drum
and head, the "DEW" indicator appears and the unit does not
operate. Wait about 1 to 2 hours after the display returns to
normal before using the unit.
Dew forms easily:
In highly humid and steamy rooms.
When carrying the unit from a cold place to a warm room.
* Use the unit at room temperatures from 5° C to 35° C. Dew
forms especially easily in cold temperature regions.
Amplifier volume adjustment
Digital audio tapes produce considerably less noise than regular
records and cassette tapes, and are extremely quiet between
programs. Be careful not to raise the volume too high and
exceed the amplifier and speaker ratings.
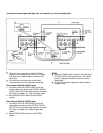
Recommended amplifier input impedance is 600 ohms or higher.
Connecting an amplifier (or other external audio device) having
an input impedance that is too low may decrease the level of the
output.
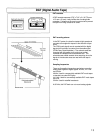
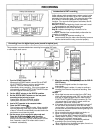
Rack mount
The front panel of this unit conforms to the 2U size standards and
can directly be installed in the 19 inch rack. However, if the
space of the rack is small, remove 4 legs from the bottom panel,
then install the unit in the rack. If the rack is not well ventilated,
the temperature inside the rack becomes high. Be sure to keep
the rack well ventilated.
WARNING: THIS APPARATUS MUST BE EARTHED
IMPORTANT: The wires in this mains lead are coloured in
accordance with the following code:
Green- and -yellow: Earth
Blue: Neutral
Brown: Live
As the colours of the wires in the mains lead of this apparatus
may not correspond with the coloured markings identifying the
terminals in your plug proceed as follows:
The wire which is coloured green- and -yellow must be
connected to the terminal in the plug which is marked by the
letter E or by the safety earth symbol
or coloured green or
green- and -yellow.
The wire which is coloured blue must be connected to the
terminal which is marked with the letter N or coloured black.
The wire which is coloured brown must be connected to the
terminal which is marked with the letter L or coloured red.
3