


Yamaha Professional Audio M7CL StageMix V4.5 User Guide
Page 26
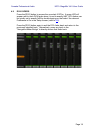
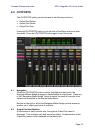
5.3 GRAPHIC EQ EDITING
GEQ Overview
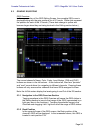
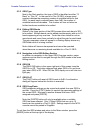
In the upper portion of the GEQ Editing Screen, the complete GEQ curve is
displayed along with the gain positions for all 31 bands. White dots represent
the position for each of the 31 bands. (These dots change to yellow and
become larger when they are being touched in the Editing section below.)
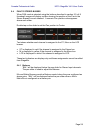
The current channel’s Name, Color, Fader, Level Meters, [ON] and [CUE]
buttons are shown in the left column. At the bottom-left, there are “previous”
and “next” arrow buttons for navigating to different channels. Pressing these
buttons will only access other channels that have GEQs assigned to them.
Note: the In/Out meters display the levels going In and Out of the EQ section.
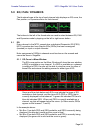
5.3.1 Navigation in the GEQ Overview Section
Tapping anywhere in the GEQ Overview will cause the GEQ sliders in
the Editing section to jump to that range of the GEQ (represented by a
light grey area in the overview). Touching the selected range in the
Overview and dragging it left / right will scroll the range of GEQ sliders.
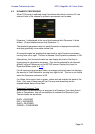
5.3.2 Rack Position
In the upper-left area of the GEQ screen, the Rack position of the
channel’s GEQ will be displayed. In the screenshot above, this GEQ is
located in rack position FX4.