


42
—Owner’s Manual
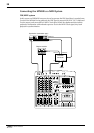
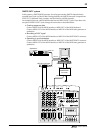
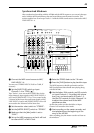
1 Connect the MT400 to the FSK/MIDI
converter or the SMPTE/MTC converter as
shown in the diagrams on pages 38 and 39.
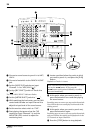
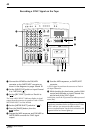
2 Connect the sound source you wish to record
on Track 1 to MIC/LINE INPUT 1, and
connect the MIDI sound source to STEREO
INPUTs 5L and 6R.
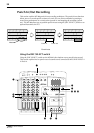
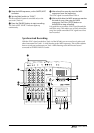
3 Set the [INPUT-FLIP] switch on Input Channel
1 to “MIC/LINE ( )”. Make sure that the
[dbx] switch is set to “SYNC”.
4 Set the [REC SELECT] switch on Track 1 to
“”.
The Track 1 REC SELECT indicator flashes.
5 Press the [PAUSE] button, then the
button.
6 Set the [METER SELECT] switch to “”.
The level meter shows the input level of the recording
source for Track 1.
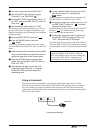
7 While checking the level meter, use the GAIN
control and the fader on Input Channel 1 to
set the recording level.
8 Set the monitor select switch to “ST+CUE”.
To make a recording while synchronizing the MIDI
sequencer, you need to monitor both the MIDI sound
source signals (routed from STEREO INPUTs 5 and 6
to the Stereo bus) and the track recording signal
(routed from Track 1 to the CUE bus). To do this, set
the monitor select switch to “ST+CUE”.
9 While playing the MIDI sequencer, use the
STEREO fader and the volume control of the
MIDI tone generator to adjust the monitoring
level of the MIDI sound source.
0 Use the CUE control on Input Channel 1 to
adjust the monitoring level of the sound
recorded on Track 1.
A Set up the MIDI sequencer so that it will lock
to external MTC or MIDI Clock.
B Press the [PAUSE] button to start recording.
The MIDI sequencer should synchronize and play
along with the MT400. You can now record sound to
Track 1, while monitoring the MIDI performance data
(in the Stereo bus) and recording sound on Track 1 (in
the CUE bus).
C Press the [STOP] button to stop recording.
Record Tracks 2 and 3 in the same way.
Note: The SYNC OUT jack always outputs Track 4
signal, regardless of the settings for Input Channel 4.
Note: MIDI sound source signal sent to the Stereo
bus is not recorded on the tracks.
1
REC
4TR