


MV800 — Owner’s Manual
12 Applications
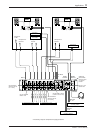
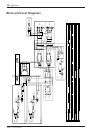
<Setting: ZONE 1>
● Channel 1-4 Settings
1. Make the following settings. Channel Volume = <,
Gate Switch = ON (>), ZONE Select Switch = only set
“1” to ON (>), ZONE 1’s ZONE Volume = <,
ST/MONO Select Switch = “ST”.
2. Adjust the GAIN control so that the PEAK Indicator
lights when you speak loudly into the microphone.
3. If necessary, use the equalizer (LO, HI) to adjust sound
quality.
● ST Channel Settings
1. Make the following settings. Channel Volume = <,
ZONE Select Switch = only set “1” to ON (>).
2. Set the ST Input Select Switch to “A” (?) and playback a
DVD with the Karaoke DVD player. Adjust the DVD
player’s output volume so that the PEAK Indicator lights
when the DVD player plays a louder passage.
3. Set the ST Input Select Switch to “B” (>) and adjust the
CD player’s output volume in the same manner as the
DVD player.
● Overall Controls
• We recommend that the compressor be switched “ON”.
Use the RATIO and TH controls to adjust the amount of
compression.
• Set the Stereo Channel DUCKER Switch to “ON” and
adjust the attenuator while producing some sound
through the system.
• Use the Volume Control for each channel to adjust the
balance between the channels.
• Use the ZONE 1 Volume to adjust the overall output
level. Adjust the level so that the level meter’s PEAK lamp
lights when a large signal is present. Use the volume
control on the power amp to adjust the volume delivered
by the speakers.
• If necessary, setup the PAGING system.
• Connect a pair of headphones to the PHONES jack and
set the ZONE AFL Select Switch to “ZONE 1 AFL” (?)
to monitor the final output.
<Setting: ZONE 2>
● Channel 5 and 6 Settings
1. Make the following settings. Channel Volume = <,
Gate Switch = ON (>), ZONE Select Switch = only set
“2” to ON (>), ZONE 2 ZONE Volume = <,
ST/MONO Select Switch = “ST”.
2. Adjust the GAIN control so that the PEAK Indicator
lights when you speak loudly into the microphone.
3. If necessary, use the equalizer (LO, HI) to adjust sound
quality.
● Channel 7 and 8 Settings
1. Make the following settings. Channel Volume = <,
Gate Switch = ON (>), ZONE Select Switch = only set
“2” to ON (>).
2. Playback a DVD with the Karaoke DVD player. Adjust
the DVD player’s output volume so that the PEAK
Indicator lights when the DVD player plays a louder
passage.
3. If necessary, use the equalizer (LO, HI) to adjust sound
quality.
● Overall Controls
• Use the Volume Control for each channel to adjust the
balance between the channels.
• Use the ZONE 2 Volume to adjust the overall output
level. Adjust the level so that the level meter’s PEAK lamp
lights when a large signal is present. Use the volume
control on the power amp to adjust the volume delivered
by the speakers.
• Connect a pair of headphones to the PHONES jack and
set the ZONE AFL switch to “ZONE 2 AFL” (>) to
monitor the overall output.