


An Example of S90 XS/S70 XS Editor in Use
S90 XS/S70 XS Editor Owner’s Manual
7
CAUTION
Regarding the data transfer for synchronization, the setting here takes precedence over that specified in Studio Manager.
Make sure to set the desired data transfer direction, regardless of the setting on the Studio Manager, in order to avoid data
loss.
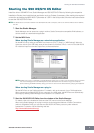
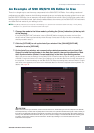
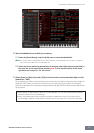
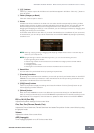
4. From the Auto Sync window, click [Start] at the bottom.
The data synchronization will be started if the Port settings are correct. As soon as data synchronization
is completed, the Auto Sync window is closed, then the OFFLINE indication is changed to ONLINE
indication automatically. In this ONLINE status, editing a parameter on the S90 XS/S70 XS Editor affects
the same parameter on the S90 XS/S70 XS itself, and vice versa.
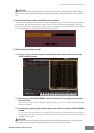
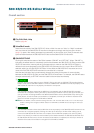
5. Edit the Voice in the Voice mode.
5-1 On the “V” row of the Voice section, click the Bank name or Voice name to call up the
VOICE LIBRARY window.
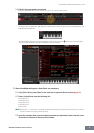
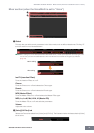
5-2 From the list in the VOICE LIBRARY, select the desired Voice to assign it temporarily to
the current Part.
You can confirm the sound of the selected Voice by clicking any note on the virtual keyboard or the S90
XS/S70 XS keyboard.
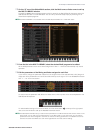
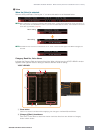
5-3 Click the Voice name or [OK] at bottom right of the window to close the VOICE LIBRARY
window.
You can cancel the Voice selection by clicking the Close (X) button or [Cancel] button at bottom right of
the window. By executing this operation, the Voice selection is reset to the original status and the VOICE
LIBRARY window closes.
CAUTION
When a different Voice has been selected, your edits of the previously selected Voice will be lost. If you want to store the
edits, make sure to store the Voice by using the Store window (page 47) before changing the Voice.