


14 DIGITAL PRO MIXER DDM4000 User Manual
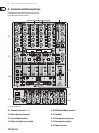
Press the CONSOLE SETUP knob 1) (51) to select the parameter
(LOW, MID, HIGH, Q MID).
Turn the CONSOLE SETUP knob to change the value of the selected parameter.2)
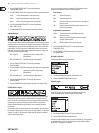
PAN1: Position of Microphone 1 in the stereo image
PAN 2: Position of Microphone 2 in the stereo image
OUT B: Volume of the microphone channel at Output B
Press the right PARAMETER knob 1) (45) to select the parameter
(PAN 1, PAN 2, OUT B).
Turn the PARAMETER knob to change the value of the parameter.2)
EQ GAIN page:
This page lets you make user default sound settings, which aect the microphone
channel in relation to the equalizer. For example, storing a boost of 5 dB in these
settings aects the signal even when the HIGH rotary knob is set to 0, that is the
center position. The high frequencies can additionally be boost or cut with the
HIGH knob. This function helps to remove problematic frequencies of your voice
or to improve speech comprehensibility.
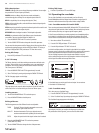
MIC 1 LOW CUT: Cuto frequency of the high-pass lter
(Microphone 1)
MIC 1 LOW, MID, HIGH: EQ default settings for Microphone 1
Press the CONSOLE SETUP knob 1) (51) to select the parameter
(LOW, MID, HIGH).
Turn the CONSOLE SETUP knob to change the value of the selected parameter.2)
MIC 2 LOW CUT: Cuto frequency of the high-pass lter
(Microphone 2)
MIC 2 LOW, MID, HIGH: EQ default settings for Microphone 2
Press the right PARAMETER knob 1) (45) to select the parameter
(LOW, MID, HIGH).
Turn the PARAMETER knob to change the value of the selected parameter.2)
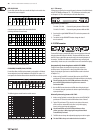
ULTRA MIC 1 and 2:
The Ultramic processor is a 2-band compressor that reduces the dynamic range
of speech. The level of loud sounds is reduced and the level of quiet sounds is
raised. This decreases the dierence between the loudest and quietest passages.
By splitting the signal into two frequency bands, a thicker, more powerful
sound is achieved without the typical artifacts, such as pumping sound or a
loss of clarity.
The settings for both microphone signals are made separately. That’s the reason
for having two Ultramic pages. For Mic 1, select the page “Ultramic 1” and choose
“Ultramic 2” for Mic 2. The parameters on both pages are identical so that they
only have to be described once.
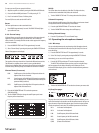
You can see several level meters on the display. Three parameters of the
compressor are adjustable plus you can also load presets.
The meters:
MIC I Shows the input level
MIC 0 Shows the output level
COM Shows the compression ratio for the low (L) and high (H)
frequency band
EXP Shows the attenuation of the expander for the low (L) or
high (H) frequency band
Adjustable parameters
THRSH Threshold species the cuto frequency of the
Ultramic processor
FREQ Adjusts the crossover frequency between the upper
and lower frequency band
EFFIC Eciency: Adjusts the level of compression
Press the CONSOLE SETUP knob 1) (51) to select the parameter
(THRSH, FREQ, EFFIC).
Turn the CONSOLE SETUP knob to change the value of the 2)
selected parameter.
Ultramic presets:
The following default settings can be loaded:
Turn the right PARAMETER knob 1) (45) to select the preset.
Press the PARAMETER knob to load the preset.2)
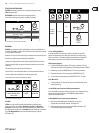
MIC FX page:
On the Mic FX page, you can select the type of eect you want to use
for the microphone signal. The following eects are available:
Turn the right PARAMETER knob 1) (45) to select the preset.
Press the PARAMETER knob to load the preset.2)
Each eect can be modied in order to suit your individual taste. Two parameters
are available for this reason. The second parameter always adjusts the eect
Dry/Wet Mix—this applies to all eects.