


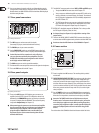


9 DIGITAL PRO MIXER DDM4000 User Manual
BPM and eects section2.5
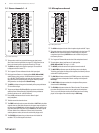
(41)
(50)
(45)
(46) (47) (48)
(50)
(42) (49)
(43) (52)(53)
(51)
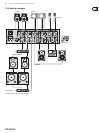
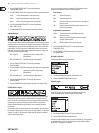
Fig. 2.5: BPM Counter and Eects section (here FX 1)
The DDM4000 has 2 identical eects units. There are 2 additional independent
eects units for the mic signal and the Sampler. All eects can be used at the
same time. The BPM Counter and MIDI Clock are also found in this section.
The graphic display shows BPM values, eect names and eect parameters (41)
as well as channel assignments. It also leads you through Console Setup.
The (42) FX ON push button activates the eects unit.
Press the (43) FX ASSIGN push button to assign an eects unit to a signal
source (push button ashes). The possible input sources are listed on
the display. Select the preferred source by turning and pressing the
PARAMETER knob (45).
The (44) DEPTH knob adjusts the eect intensity (depth). For some eects,
it also lets you adjust the mix between the original signal (dry) and
the eect signal (wet).
Press the (45) PARAM (eter) knob to select the eect parameters. By turning
the knob, you can change the parameter shown on the display.
Press (46) SELECT/LOW to access the eects list (on the display). Turn and press
the knob (45) to load a preset.
Press the (47) PARAM/MID push button to access the eect parameters.
Turn the knob (45) to change the parameter value.
Press (48) DEFAULT/HIGH to restore a preset.
When the effect is activated (by pressing the FX ON push button), ◊
the push buttons (46) (LOW), (47) (MID) and (48) (HIGH) are used as
Kill switches in the effect’s signal path.
Depending on the selected eect, the (49) BEAT push buttons can adjust
time-related parameters. However, the values entered are not in
milliseconds or similar units, but in beats.
To enter the tempo manually, tap this push button (at least 2 x) in the rhythm (50)
of the music (TAP). By keeping the AUTO BPM/TAP push button pressed a
little longer (> 1 s), the automatic tempo input (AUTO BPM) is reactivated.
Turn the (51) CONSOLE SETUP knob to adjust the tempo of the MIDI Clock
(press and turn simultaneously = coarse adjustment). A short press on
the knob conrms the entry made. A long press on the knob lets you
access Console Setup (see Chapter 3.1).
The (52) MIDI START/STOP/ESC turns on the MIDI Clock.
The (53) ADJUST push buttons let you transfer the tempo of the BPM counter
to the MIDI Clock.
All functions of the BPM and Effects section are de-scribed in ◊
detail in Chapter 4.
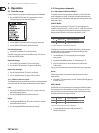
Sampler2.6
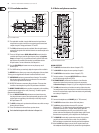
(54)(54)
(57)
(59)
(63)
(65)
(62)
(56)
(60)
(64)
(66)
(61)
(58)
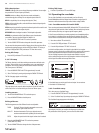
Fig. 2.6: Sampler section
Press the (54) INSERT push button to add the sampler signal to the channel
(Insert Mode). If the push button is not activated, the sampler is mixed to
the selected channel (Mix Mode). In both cases, playback is initiated with
the REC SOURCE push buttons. When the sampler is routed to the crossfader,
the LED of the INSERT push button goes out.
The (55) VOLUME/MIX knob controls the volume of the sampler (in Mix Mode)
as well as the volume balance between input signal and Sampler
(in Insert Mode).
The (56) REC SOURCE push buttons let you select the channel for recording
and playing back samples.
Press the (57) PFL push button to listen in on the sampler signal with the headphones.
SAMPLE LENGTH(58) adjusts the recording time (1–16 beats or endless recording ∞).
RECORD/IN(59) lets you record to the Sampler. Select a bank beforehand.
By pressing the push button a second time, the recording is stopped
(only in ∞ Mode).
BANK ASSIGN(60) is used to select a bank in which the recorded material
is stored. The selected bank is indicated by the relevant MODE push button
(61) which signalizes the readiness to record.
The (61) MODE push buttons (Bank 1 and Bank 2) are used to select the sampler’s
types of playback (Reverse and Loop). A short tap activates or deactivates
the Reverse function; pressing the push button a little longer activates or
deactivates the Loop function.
Press the(62) PLAY/OUT push button to start the playback of the recorded
sample. When the Loop function is deactivated, the sample is only
played back as long as the PLAY push button is pressed.
Press (63) SMP FX ON push button to activate the Brake eect.
Press the (64) SELECT push button to determine the length of the brake
(1, 4 or 8 Beat Brake, which is shown in the center of the display).
The (65) CF ASSIGN push button lets you determine on which side of the
crossfader the sampler signal is to be routed to.