


24 DIGITAL PRO MIXER DDM4000 User Manual
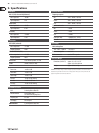
MIDI protocol7.1
The MIDI format is used for the data transmission. Knobs and faders send
Control Change messages (CC), and push buttons send Note messages
(see Table 10.2). Access the software settings to assign mixer controls to
software functions. Most software applications oer a learn function to
make the assigning even easier.
The MIDI transmission also works in the opposite direction. Basically, it is
conned to controlling the LEDs, so that a switching status in the software
application can also be shown on the DDM4000. In this case the DDM4000
receives CC messages from the computer. Each LED of the DDM4000 is assigned
to a CC number (see Table 10.3). Sending the value 0 makes the LED go out,
but sending the value 1 (or any higher value) turns on the LED.
Common MIDI settings7.2
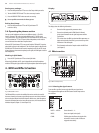
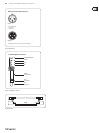
The MIDI settings are made on the MIDI Setup page.
Press the CONSOLE SETUP knob 1) (51) for approximately 2 seconds.
Select “MIDI Settings” by turning and pressing the CONSOLE SETUP knob. 2)
The MIDI Setup page appears on the display:
This page allows you to make the following settings:
Adjusting the MIDI channel (7.2.1)•
Sending a MIDI dump (7.2.2)•
Conguring the Microphone channel, Sampler and crossfader as •
MIDI controller (7.3)
Conguring stereo channels as MIDI controllers (7.4)•
Press the ESC push button 3) (52) to exit MIDI Setup.
Save the settings you made in a user preset (see Chapter 3.5.2 ◊
“Storing user settings”) in case you want the settings to be active
the next time you switch on the device.
Setting the MIDI channel7.2.1
The following describe how to specify the MIDI channel on which the DDM4000 is
to send controller data. The receiving device needs to be set to the same channel.
Open MIDI Setup (see Chapter 7.2).1)
Turn the left PARAMETER knob 2) (45) to select the MIDI channel.
Press the ESC push button 3) (52) to exit MIDI Setup.
Sending a MIDI dump7.2.2
A MIDI dump sends the values of current controller positions. As a result,
the DDM4000’s settings are aligned with the connected computer.
Open MIDI Setup (see Chapter 7.2).1)
Press the left PARAMETER knob 2) (45) to start the MIDI dump.
After sending the dump, the DDM4000 returns to MIDI Setup.
Press the ESC push button 3) (52) to exit MIDI Setup.
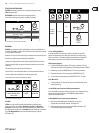
Conguring microphone channel, 7.3
sampler and crossfader as MIDI controller
The Microphone channel, the Sampler and the crossfader section can individually
be converted to MIDI controllers.
Open MIDI Setup (see Chapter 7.2).1)
Turn the CONSOLE SETUP knob 2) (51) to select the mixer section
(MIC, SAMPLER, CROSSFADER) you want to use.
Press the CONSOLE SETUP knob to conrm the selection. 3)
The LEDs of the selected section go out.
Press the ESC push button 4) (52) to exit MIDI Setup.
Particularities of the crossfader:
It is not possible to assign the stereo channels to the crossfader when the
crossfader section is dened as controller. The Assign push buttons are
inoperative. The routing behaves as if the crossfader is deactivated: the signals
are directly fed to the mixer’s sum. As for the Sampler, the CF Assign function and
CF Start function are also inoperative. As usual, the routing of the Sampler signal
is realized with the REC SOURCE push button.
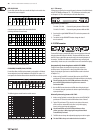
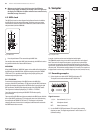
Conguring stereo channels as 7.4
MIDI controller
Using the channel fader (8), the EQ knobs (4) and the kill push buttons (5)
and (6) generates MIDI data when one of the 4 stereo channels is congured
as MIDI controller. The congured channel is still able to play back music,
however, the equalizer, the channel fader and the CF Assign function are not
active. In case an audio signal is being fed to the selected channel, it is routed to
the mixer’s sum without being processed and at full volume level. Simply mute
the signal in case the audio function is not required.
Open MIDI Setup (see Chapter 7.2).1)
Turn the right PARAMETER knob 2) (45) to select the stereo channel you want
(and, if required, the Mute function).
Press the PARAMETER knob to conrm the selection. The push-button LEDs 3)
of the selected channel go out.
Press the ESC push button 4) (52) to exit MIDI Setup.
Level jumps can occur when activating or deactivating the MIDI ◊
controller function in a stereo channel depending on the position of
the equalizer and fader! Turn the OUTPUT knob in the Main and Phones
section completely to the left before activating this function.
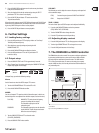
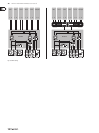
Installation8.
The inputs and outputs of the BEHRINGER DDM4000 are RCA connectors.
The Headphone output is a stereo jack. The Microphone inputs are
XLR connectors.
Make sure that only competent people install your DDM4000. ◊
They must be sufficiently earthed during and after the installation
process. Otherwise, electrostatic discharges may negatively affect the
operating characteristics of your equipment.