


13
E
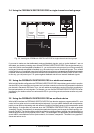
only after about one second, which is indicated by a dot in the lower right corner of the display.
After loading the data, the FEEDBACK DESTROYER PRO enables the preset and the dot
disappears. This brief interruption avoids the direct activation of every preset, as you scroll
through the preset list with the jog wheel. Thus, the FEEDBACK DESTROYER PRO makes sure
that no "unwanted" programs are loaded unintentionally. Additionally, you can rotate the jog
wheel at high speed and still have the time to specifically select the preset of your choice,
instead of any of its "neighbors".
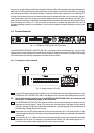
2.4.2 Choice of mode
Each filter mode has two letters assigned to it, who appears in the display after pressing the FILTER MODE
key. The following display messages can be recognized:
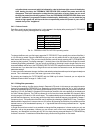
Display Mode of operation
OF Off
PA Parametric EQ
AU Auto
SI Single Shot
LO Locked (S)
Tab. 2.1: FEEDBACK DESTROYER PRO operating modes
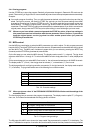
To change the filter mode, you first have to press the FILTERSELECT key to specify the number of the filter (1
to 12) with the jog wheel. Using the ENGINE keys you can not only select the left or right channel, but also
both ones at the same time. Then you can choose the filter mode by simply pressing the FILTER MODE key
and turning the jog wheel. The display message L (locked) informs you that a filter from the Single-Shot mode
is already suppressing a feedback. You can unlock such a filter by switching it back to single mode. As soon
as a new feedback will be found, the FEEDBACK DESTROYER PRO switches the filter from the old frequency
to the new one. If you leave the Auto or Single-Shot mode and enter the Parametric mode, the filter keeps all
parameter settings.
In order to avoid an inadvertent change, the filter mode selection takes place after a period of approximately one
second. This is indicated by a dot in the lower right corner of the display.
By pressing and keeping the FILTER MODE and the GAIN key for about 2 seconds you can adjust the
feedback threshold within a range of -3dB to -9dB.
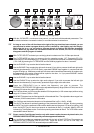
2.4.3 Editing filter parameters
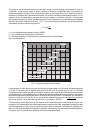
To change filter settings, the filter has to situate in Parametric EQ mode. In this case you can adapt the center
frequency by pressing the FREQUENCY key. Depending on the frequency, either the Hz or kHz indicator to
the right of the display lights up. If you want to lift the frequency to e.g. 2700Hz turn the jog wheel until the ISO
frequency (2.5kHz, see table 6.1 standard ISO frequencies) closest to this value appears in the display and
the kHz indicator lights up. The FINE key allows you to fine tune the chosen standard ISO frequency within
a tuning range of 1/3 octave (in 1/60-octave steps). The mathematical proportion between the displayed value
and the absolute frequency, and an easy guide to quickly find the desired frequency is available in chapter 7
(frequency chart). The bandwidth of the filter can be adjusted by selecting the BANDWIDTH key. The adjust-
able bandwidth ranges from 2 octaves down to 1/60 octave. By pressing the GAIN key it is possible to set the
desired boost or cut of the selected frequency. A + signals that the level is being increased and a - signals
a decreasement.
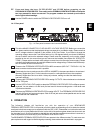
In Single-Shot and Auto mode it is not possible to change the filter parameters. In these modes you only are
allowed to call up the parameters. However you can convert such a filter into a parametric one with same
frequency, and bandwidth, but with a gain of 0dB. You simply have to press and keep the FILTER MODE key
for about 2 seconds. To reactivate a locked filter simply choose the Single-Shot or Auto mode.
2. OPERATION