


189
Section 3
Creating rhythm arrangements
If you cannot find a rhythm arrangement that suits your song
among the BR-1600CD’s preset rhythm arrangements, you
can easily create an original arrangement as described below.
Assembling drum and bass patterns
1.
Make sure that PROGRAMMABLE RHYTHM
[ARRANGEMENT/PATTERN] is lighted (you’re in
Arrangement mode).
If this button’s indicator is off (meaning that you’re in
Pattern mode), press PROGRAMMABLE RHYTHM
[ARRANGEMENT/PATTERN] so it is lighted.
2.
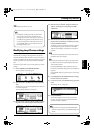
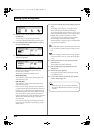
Press PROGRAMMABLE RHYTHM [EDIT].
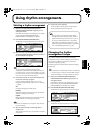
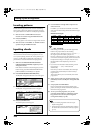
The Rhythm Arrangement Selection screen will appear.
fig.21-33d
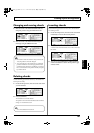
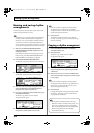
3.
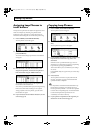
Press [F4] (DRUMS) when you want to assemble a
drum pattern or [F3] (BASS) when you want to
assemble a bass pattern.
The corresponding screen for assembling patterns into
rhythm arrangements will appear.
Drum pattern assembly screen
fig.21-08d
Bass pattern assembly screen
fig.21-09d
These screens allow you to assemble drum patterns and
bass patterns in units of one measure.
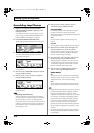
4.
Move the cursor to “MEASURE” and select a measure
using the TIME/VALUE dial.
5.
Move the cursor to “PATTERN” or “NAME” and select
a pattern number or name using the TIME/VALUE dial.
fig.21-10ad
The selected pattern will now be assigned to the selected
measure.
6.
Move the cursor to “LENGTH” and set the length of the
selected pattern as a number of measures.
Note that when the length is changed in this way, the
position of all patterns assigned to subsequent measures
will also change accordingly.
7.
When you have assembled patterns as required, press
[EXIT/NO] to return to the Rhythm Arrangement
Selection screen.
8.
To save your pattern allocations, carry out the
procedure described below in “Modifying all of the
loop phrases in the current rhythm arrangement
(Arrangement Modify)” (p. 195).
Canceling pattern allocations
If you want to cancel the pattern allocations that you have
made, return to the screen for assembling drum or bass
patterns into rhythm arrangements, and then carry out the
following procedure.
1.
Move to the measure containing the pattern to be
removed, and then press either [F2] (DELETE), [F3]
(ERASE), or [F4] (CLEAR ALL).
[F2] (DELETE):
The pattern allocation will be canceled and all subsequent
pattern allocations will be shifted forward by one measure.
[F3] (ERASE):
The pattern allocation will be canceled, leaving an empty
measure where the pattern had been.
[F4] (CLEAR ALL):
Pattern allocations for all measures will be canceled.
• “*TMP” appears for the rhythm arrangement
immediately after its data is recorded or edited. If
you try to select a different rhythm arrangement
with the TIME/VALUE dial while the cursor is
positioned above this, the cursor turns white. If you
press [ENTER/YES] at this point, the cursor reverts
to black, and the rhythm arrangement number is
confirmed. If you do not want to confirm it, press
[EXIT/NO]; “*TMP” is indicated again, and the
rhythm arrangement reverts to the state it was in
immediately after editing. This allows you to avoid
inadvertently erasing data you have edited.
• From now on, you cannot use the Undo function
(Basic Operation; p. 42) for creating or editing
rhythm arrangements. Please make sure to crate or
edit data with a special care.
BR-1600_R_e.book 189 ページ 2007年12月6日 木曜日 午前9時52分