


25
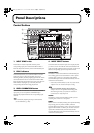
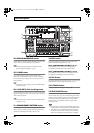
Panel Descriptions
MULTI-TRACK:
All input sources are selected in MULTI-TRACK mode.
When this mode is used, each source will be recorded on the
corresponding track (i.e., 1 through 8 or 9/10 through 15/16).
STEREO TRACKS:
All input sources are selected in STEREO TRACKS mode. In
this case, the audio from the input sources will be mixed in
stereo and then recorded on the track selected for recording.
If you wish to read more about the operation of the INPUT
SELECT buttons, refer to “Operation of the INPUT SELECT
buttons” (p. 280).
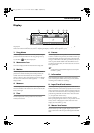
5. EFFECTS button
Use this button to select an insert effects’ patch (p. 74) and to
call up the screen for editing effects settings and the like.
6. INPUT LEVEL knob
Adjusts the volume of all input sources, and the volumes
determined using this knob are the actual volumes that will
be recorded on tracks.
When either [MULTI-TRACK] or [STEREO TRACKS] has
been selected from INPUT SELECT, you can use this knob to
adjust the overall volume while maintaining the balance of
volumes set up for the various input sources.
7. TUNER ON/OFF button
Use this button to turn the tuner (p. 256) on and off.
8. REC MODE (recording mode) button
This is used to prepare the BR-1600CD for recording. In
addition, it also allows you to select one of the following
three recording modes:
INPUT:
Allows you to record the instruments and microphones
connected to the input jacks. The units is normally used in
this mode.
BOUNCE:
Allows you to mix the audio from several tracks and to
record it on one or two different tracks.
MASTERING:
Allows you to master your finished songs using the BR-
1600CD’s Mastering Tool Kit.
If you wish to read more about the various recording modes,
refer to “REC MODE (Recording Mode) Operations” (p. 285).
9.
REC MODE (recording mode) indicators
Allow you to confirm which recording mode is currently
selected. Whenever you change the recording mode using
the REC MODE button, the INPUT, BOUNCE, or
MASTERING indicator will light up accordingly.
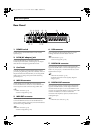
10. MARKER
The MARKER section is used to make settings for the marker
function.
MARK button:
Use this button to position a marker at any point within your
song. Each time this button is pressed, the BR-1600CD will
place a marker at the current position.
Markers are numbered in sequence from the beginning of the
song. In addition, you can also assign names to individual
markers. If a marker has been placed at the current position,
the corresponding number will appear in the display’s
Marker box; if no marker has been placed here, the Marker
box will show the number of the last marker before the
current position. Appropriately placed markers allow you to
quickly confirm which section of the song is being played.
“Placing markers in your song (Marker)” (p. 48)
SEARCH button:
Use this button to jump back to the previous marker before
the current position.
SEARCH button:
Use this button to jump forward to the next marker after the
current position.
CLEAR button:
Use this button to delete markers. Specifically, the marker
currently being shown in the display’s Marker box will be
deleted when this button is pressed.
BR-1600_R_e.book 25 ページ 2007年12月6日 木曜日 午前9時52分