


42
Re-recording only the portion that is mistaken (Punch In/Out)
You may occasionally make a mistake during a recording, or
the performance may not turn out the way the musician
intended. In such cases, you can use functions known as
punch in and punch out to re-record specific parts of the
performance. Specifically, punch in refers to an action where
recording is started while listening to playback of a track,
and punch out refers to the reverse situation where recording
is stopped but playback of the track can still be heard. In
other words, you punch in at the start of the section you
want to re-record, and you punch out at the end of that
section.
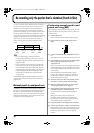
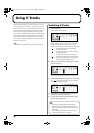
fig.10-01
• If you are still not happy with the track after re-
recording with punch in and punch out, you can use
Undo (Basic Operation; p. 42) to restore the track to its
original condition.
• Even if a portion of a track has been re-recorded using
punch in and punch out, the replaced audio data will
remain on the BR-1600CD’s hard disk. If this data will
not be used again, Song Optimization (p. 70) allows you
to delete it together with other unneeded data, thus
ensuring that you make the most of the hard disk’s
storage capacity.
The BR-1600CD supports two different types of punch in/
out procedures—namely, manual punch in/out and auto
punch in/out.
Manual punch in and punch out
Use [REC] or a foot switch to activate punch in and punch
out. If you are both playing the instrument and operating the
BR-1600CD, it can often be difficult to press [REC] at the
right time. In such a case, a foot switch (such as the optional
Roland DP-2 or BOSS FS-5U) can be used to activate punch
in and punch out conveniently by foot.
Performing manual punch in and
punch out using [REC]
The following section will describe using manual punch in
and punch out to re-record a portion of Track 1, which was
recorded earlier.
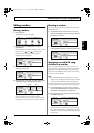
1.
Press the TRACK [1].
This track button will start to flash orange and green.
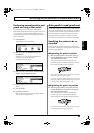
2.
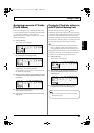
Move the fader for Track 1 to the position shown
below.
fig.10-02
3.
Confirm that [ON/OFF] from AUTO PUNCH is not lit
up.
If this button is lit, it will need to be pressed to turn it off.
4.
Start playback of your song and use the INPUT LEVEL
knob to adjust the volume of the input to an
appropriate level.
If you want to mute Track 1 during playback, hold down
[TRACK MUTE] and press the track button for this track.
You can then perform the same procedure once again to
cancel muting.
Listen to both the recorded audio and the input to
compare their volumes. If necessary, use the INPUT
LEVEL knob to adjust the volume of the input so it is
identical to that of the recording.
5.
When the volume levels have been matched, confirm
that Track 1 is not being muted before proceeding.
6.
Move to a position before where you want to start re-
record and press [PLAY] to start playback.
7.
When playback reaches the beginning of this section,
press [REC] to punch in and start recording.
To punch out after recording, press either [REC] or
[PLAY].
[REC] can be used to punch in and punch out
repeatedly, and if any other sections need to be re-
recorded, you can use the same procedure described
above without having to stop playback.
8.
Press [STOP] when re-recording has been completed.
9.
Listen to the performance with the re-recorded section.
Make sure that you move the current position to a point
before the re-recorded section before starting playback.
If necessary, use the fader for Track 1 to adjust its
volume.
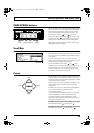
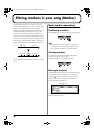
Time
Punch-in
Stop
Start
[PLAY] [REC] [REC] [STOP]
Punch-out
Playback PlaybackRecording
BR-1600_R_e.book 42 ページ 2007年12月6日 木曜日 午前9時52分