


E-8
Selecting and Using Built-in Tones
419A-E-010B
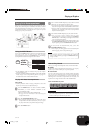
Using Layer and Split Together
You can use the following procedure to layer two tones on the left
side of the keyboard (left main tone + left layered tone), and two
other tones on the right side (right main tone + right layered tone).
1
Use the procedure under “Selecting a Tone” to select
the right main tone.
2
Use the procedure under “Splitting the Keyboard
between Two Tones” to select the left main tone.
3
Press the SPLIT button to temporarily turn off split (SPLIT
indicator lamp unlit).
4
Use the procedure under “Layering Two Tones” to select
the left layered tone.
5
Press the LAYER and SPLIT buttons as required so the
indicators of both buttons are lit.
6
Use the procedure under “Layering Two Tones” to select
the right layered tone.
7
Use the procedure under “To specify the keyboard split
point” to specify the split point.
8
Now you can play using your layered tones and split
keyboard.
• After you are finished using layer and split, press the
LAYER button to unlayer it and the SPLIT button to
unsplit it.
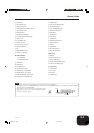
Split point
Split Tone
Split Tone
+
Layered Split Tone
Layered Split Tone
Main Tone
+
Layered Tone
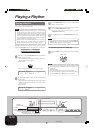
Splitting the Keyboard between
Two Tones
You can assign different tones to keys on the left side and the right
side of the keyboard.
1
Use the procedure under “Selecting a Tone” to select
the tone you want to assign to the right side of the
keyboard.
Example: To select Grand Piano, press the PIANO button,
and then rotate the dial until “Grand Piano” is
displayed as the tone name.
2
Press the SPLIT button.
• This causes the SPLIT indicator lamp to light.
3
Select the tone you want to assign to the left side of the
keyboard.
Example: Strings
• Now you can play using the two tones.
4
After you are finished using the split keyboard, press
the SPLIT button again to unsplit it.
• This causes the SPLIT indicator lamp to go out.
To specify the keyboard split point
1
While holding down the SPLIT button, press the
keyboard key where you want the left limit of the high
range (right) tone to be.
• A note does not sound when you press a keyboard key at
this time.
NOTE
• The split point is the boundary between the Auto
Accompaniment area (pages E-11, E-12) and the melody area
of the keyboard. You can change the location of the split point,
which also changes the sizes of the keyboard areas.
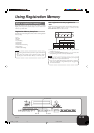
Split Point
Strings Grand Piano
Low range
Left limit of the high range
High range
S
p
l i t 0 P o i n t : 00000
F#30000000000000000000
PX400R_e_01-16.p65 04.8.24, 4:34 PM8