


7
CP-3 Digital Surround Processor
2
Controls and
Indicators
The Front Panel
Installation and
Calibration
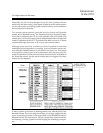
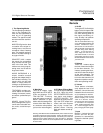
The PROGRAM button steps
through the modes of the
bank currently in use. Using
its Expanded modes, the CP-
3 can have as many as 45
operating modes: Presets 1-
15 are configured at the fac-
tory, those labeled User A1-
15 and User B1-15 are avail-
able for storage of modes
customized by the user.
In Standard operation, 5
modes are available.
7. Volume
The VOLUME buttons adjust
the level of all channels si-
multaneously. These buttons
assume the function of the
volume control on your
preamp or receiver.
8. Main Mute
MAIN MUTE turns off all out-
puts and lights both MAIN
and EFFECTS MUTE LEDs.
9. Effects Mute
3. Alphanumeric Display
The alphanumeric LCD (liq-
uid crystal display) shows
both the mode that is running
and its modifiable parame-
ters. The contrast of the LCD
can be adjusted for optimum
visibility. See Page 18. (A
video on-screen display is
described on Page 19.)
4. Infrared Receiver
The small unlabeled window
to the right of the LCD houses
the infrared receiver used by
the CP-3 to detect signals
from the remote controls.
5. Bank
In Expanded operation, the
BANK button cycles through
the Preset bank and two User
banks (A&B) where custom-
ized modes can be stored.
The mode number doesn't
change: if you are using Pre-
set 9, pressing BANK once
switches to User A9, press-
ing it again switches to User
B9, pressing it again
switches back to Preset 9. In
Standard operation, the
BANK button is inoperative.
6. Program
1. Input
The four INPUT buttons are
used to select which input is
processed by the CP-3.
Pressing any one of these
buttons will select that input
and light the LED above it.
The CP-3 can be pro-
grammed to engage a spe-
cific operating mode for each
input, so changing inputs
may change the mode being
used. See Auto-Mode Load,
Page 24.
2. Input Level Display
The INPUT LEVEL display
monitors the level in the CP-
3's digital encoding circuits
and is used to indicate the
correct Dolby level for video
sound sources (marked by
the double-D symbol be-
tween the LEDs.) When cor-
rectly set, the loudest pas-
sages will light the entire row
of green LEDs, the two yellow
ones, and occasionally flash
the red peak LEDs at the top.
See Page 22, Setting Input
Levels. (The input level me-
ters can be turned off to elimi-
nate distraction — See Page
19.)
EFFECTS MUTE turns off all
signals added by the CP-3,
lights the yellow EFFECTS
MUTE LED on the front
panel, and displays “EF-
FECTS MUTED.” This by-
passes all signal processing
in the CP-3 except level con-
trol, and is the simplest way
to play “normal” two-speaker
stereo. Pressing again will
restore normal operation.
10. On/Off
ON/OFF alternately puts the
CP-3 into and out of standby
mode. Turning the CP-3 off
with this button (or with either
remote) deactivates the unit
while leaving power to the
signal processing circuitry to
keep it at optimum operating
temperature. Although this
switch may be used to turn
the CP-3 off, it is important
that the CP-3 be turned on
with the remote control that
will be used during each lis-
tening session. If the front
panel switch is used to turn
on the CP-3, it will resume
operation in whichever mode
(Standard or Expanded) it
was last in.