


23
CP-3 Digital Surround Processor
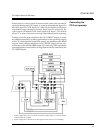
Calibration
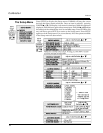
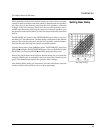
The PARAM ▲ and ▼ buttons increase or decrease the input gain for the
input you have selected over a range of -18dB to +12dB. Your setting is
displayed(in dB) as the MAN (manual) setting. The AUTO setting shows
the optimum input level as determined by the CP-3. If the manual level is
set too high, causing input overload, the input level will automatically
decrease to the point at which it is no longer causing overload.
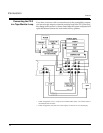
You can observe this in action by pressing PARAM ▲ until the manual and
automatic gain settings are both at +12dB, then play a reasonably loud
selection (typically on CD) into this input. You will notice that, while the
MAN setting will remain at +12dB, the AUTO setting will decrease until the
input is no longer causing distortion. This is an excellent way to determine
the optimum setting for the input level. Observe the value of the AUTO
setting with a variety of program material and set the MAN gain a few dB
above the AUTO setting by pressing PARAM ▲ two or three times.
Following are some general recommendations for level settings:
Compact Disc player: -03dB
Multi-Disc (Combi) player: +06dB
Video Disc player: +06dB
Cassette deck: +03dB
AM/FM Tuner: +06dB
When you have selected an input level, press STORE to save the setting and
return to the Input Menu. Follow this same procedure for each input.
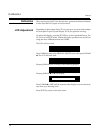
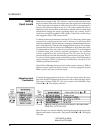
You can assign a name (up to 16 characters) to each of the inputs. This will
identify the source whenever an input is selected. In the Input Menu, select
"SET INPUT NAME", then press PARAM ▲ or ▼.
The On-Screen display will show the 2-line input name display with the
leftmost character on the second line flashing. (The LCD indicates the
character being adjusted with an underline cursor.) PARAM ▲ and ▼ will
move you forward and backward through the available characters.
PARAM will step you to the next character in the name. The sequence of
available characters is:
(*) + , – . / 0-9 A-Z *
Note that the On-Screen display uses a blinking asterisk (*) to denote a blank
space. On the LCD spaces are blanks with an underscore cursor. Press
STORE to save the setting and return to the Input menu.
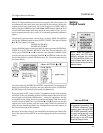
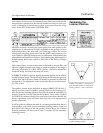
All values are referenced to true clipping,
which is 00dB. Values shown are the
minimum required to light the LEDs.
If using a Dolby Level test tone, adjust
the input level to the point at which the
LEDs adjacent to the double-D marker
just light.
Assigning Input Names