


8
Lexicon
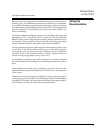
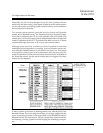
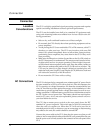
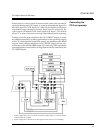
The Rear Panel
Controls and
Indicators
CAUTION: Never make or break any connections
to the CP-3 with the rear-panel power ON. Make
sure any associated amplifiers have been turned
off for at least one minute before turning this
master power switch on or off.
1. Power On/Off
The master power switch
should be left ON when the
unit is in regular use. When
the CP-3 will not be used for
an extended period of time,
or whenever you are con-
necting or disconnecting any
cables to the unit, this switch
should be turned OFF.
2. Power Connector
Connect the supplied AC
power cord here, then plug
the cord into an unswitched
outlet. Be sure that the power
cord is firmly seated in this
connector.
3. Video In and Video Out
The three video inputs are
switched with their corre-
sponding audio inputs and
fed to VIDEO OUT. VIDEO
OUT should be connected to
a video input on your monitor
for the On Screen display to
work. The CP-3 will generate
a blue background field if
there is no video signal in the
selected input. If the CP-3 is
turned off via the front panel
or either remote, the last in-
put selected will continue to
be passed to the video out-
put. If the rear-panel master
power switch is turned off, or
if AC power is removed from
the unit, the video output will
default to Input 1.
4. Tape Out
This provides an unproc-
essed, buffered audio output
of whatever input has been
selected. This output will be
active if the CP-3 is turned off
via remote, or front panel,
but is shut off when the rear-
panel master power switch is
turned off.
5. Audio Inputs and
Outputs
There are four stereo audio
inputs on the CP-3. Input 4 is
audio only; it uses the video
signal from Video Input 1.
Stereo outputs are provided
for Front, Side, and Rear
amplifiers, as well as single
monaural outputs for the
Center speaker amplifier and
the Subwoofer amp.