


4
Introduction
to the CP-3
Lexicon
System Overview
Although the CP-3 performs very complex signal processing, a great deal of
effort has gone into making the technology behind the effects as transparent
as possible to the user. To understand the overall organization of the unit,
it is helpful to define those few terms which are unique to the CP-3.
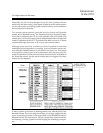
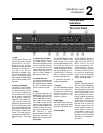
Mode A mode is a configuration that determines how the CP-3 will
process an input signal. The CP-3 contains four basic modes: Panorama,
Ambience, Reverb and Surround. Each of these basic modes has a set of
variations which are labeled on the Expanded remote (1-15). In this
manual, these 15 variations are also referred to as modes.
Parameter Each mode has a set of parameters (controls) that uniquely
characterize it. The settings of the parameters can be changed to create
custom User modes.
Mode Parameter values are stored/recalled in Presets and User modes.
Some examples are: Delay Time, Bass Split, etc.
System parameter values are not associated with a particular mode.
System parameters are not stored in User registers or Presets, nor do
their values change when a new mode is recalled. Examples are: display
contrast, volume, etc.
Register The CP-3 contains 45 registers, or memory locations, where
modes are stored.
Bank The CP-3's 45 registers are organized into 3 banks, of 15.
Presets One bank of 15 registers is loaded with the modes which appear
on the Expanded Remote. These modes are presets which are perma-
nently initialized at the factory. Presets appear on the display with their
names and their numbers preceded by the letter P.
User Registers Two banks of 15 registers each are designated as User
registers. These are available for storing your own custom modes. The
factory presets cannot be overwritten, but they can be modified and
stored into User registers (or copied into registers,then modified). When
shipped, the CP-3 has a duplicate of the presets loaded into both Bank
A and Bank B. The contents of User registers appear on the display with
their names and their numbers preceded by the Letter A or B.
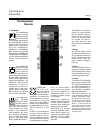
Press SETUP to display the Setup menu. PARAM will step a cursor
through the Setup menu selections. Once an item is selected, pressing
PARAM ▲ or ▼ will display a sub-menu for that item. With the sub-
menu displayed, PARAM once again selects menu items. PARAM ▲
and ▼ adjust the settings of the selected item over its available range.
Press STORE to exit any sub-menu; press SETUP to return to the Setup
menu. Press SETUP again to exit the Setup menu.
Glossary of Terms
Finding your way around